Jyrone Parker is an American software engineer and entrepreneur from Louisville, KY. He is the owner and CEO of J Computer Solutions LLC, a full-scale IT agency that deals with hardware, networking, and software development. He is also a tech rapper and producer that goes by the name Mastashake.
In this second part of the tutorial (here is part one) I show you how to work with Stripe webhooks, create a manifest.json file and implement push notifications. The full source code is listed below here. An important part of any point of sales system, is alerting you when you have successful transactions among other things. Stripe has a wonderful webhook system that allows us to interact with the system with events. A full list of events can be found here if you want to expand the source code. In part 3 I will show you how to add customers to your POS platform and what can be done by doing so. Don’t forget to like the video and subscribe to my Youtube channel!
Creating web apps for the fun of it is cool, but we all need to get paid right?! This new series explores how to create a point of sales system with Laravel, Vue.js and the Stripe API. A point of sales system (or POS) is software solution that allows you to process money. In this case we will use Stripe to process credit/debit cards as well as manage inventory. Using a fullstack Laravel and Vue.js application we can collect money, send invoices and get paid all in one location. By the time this series is over you will have used:
Laravel Passport
Laravel Socialite
Stripe Charge API
Stripe Product API
Stripe Subscription API
All of the source code is available at https://github.com/mastashake08/laravel-vue-pos. In part one I explain what it is we are building today as well as setting up the ground work for the future. Watch the video below and don’t forget to subscribe to the channel and share the video! Lastly don’t forget to check out the live version right here! Now on to part 2.
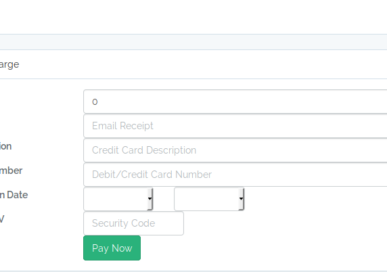
In part one we created a point of sales system using Laravel and Vue (if you haven’t done part 1 here is the source code). It had very basic functionality but it got the job done, you could charge debit/credit cards. The basic design looked like this
In part two we will add email invoice functionality so that we can email our customers and they can pay without us having to know their account information. For this we will be using Laravel’s notification framework on the backend and utilizing the web payment request API with Vue.js on the front end.
The Invoice Model
In the command line we will create a new model to represent our invoices type in the following command to generate your model and migration
php artisan make:model -m Invoice
Once the model and migration are made, open up migration and edit accordingly:
<?php
use Illuminate\Support\Facades\Schema;
use Illuminate\Database\Schema\Blueprint;
use Illuminate\Database\Migrations\Migration;
class CreateInvoicesTable extends Migration
{
    /**
     * Run the migrations.
     *
     * @return void
     */
    public function up()
    {
        Schema::create('invoices', function (Blueprint $table) {
            $table->increments('id');
            $table->string('name');
            $table->longText('description');
            $table->integer('amount');
            $table->string('email');
            $table->string('charge_id');
            $table->boolean('is_paid')->default(false);
            $table->timestamps();
        });
    }
    /**
     * Reverse the migrations.
     *
     * @return void
     */
    public function down()
    {
        Schema::dropIfExists('invoices');
    }
}
As you can see there are only a few fields
name of person being invoiced
description of the invoice
amount to be invoiced
email address for invoice to be mailed to
stripe charge id
boolean indicating whether or not the invoice has been paid
Open up the Invoice.php model and add the following to the $fillable array
<?php
namespace App;
use Illuminate\Database\Eloquent\Model;
use Illuminate\Notifications\Notifiable;
class Invoice extends Model
{
    use Notifiable;
    //
    protected $fillable = ['name','amount','email','description','charge_id'];
}
Next we need to create some api routes and a RESTful controller. Let’s start with the routes, open up routes/api.php and add the following routes
Open up the controller and replace with the following
<?php
namespace App\Http\Controllers;
use Illuminate\Http\Request;
use App\Invoice;
class InvoiceController extends Controller
{
  public function __construct(){
    \Stripe\Stripe::setApiKey(env('STRIPE_SECRET'));
  }
    /**
     * Display a listing of the resource.
     *
     * @return \Illuminate\Http\Response
     */
    public function index()
    {
        //
        $invoices = Invoice::where('is_paid',true)->get();
        return response()->json([
          'invoices' => $invoices
        ]);
    }
    /**
     * Show the form for creating a new resource.
     *
     * @return \Illuminate\Http\Response
     */
    public function create()
    {
        //
    }
    /**
     * Store a newly created resource in storage.
     *
     * @param  \Illuminate\Http\Request  $request
     * @return \Illuminate\Http\Response
     */
    public function store(Request $request)
    {
        //
        $invoice = Invoice::Create($request->all());
        $invoice->notify(new \App\Notifications\InvoiceCreated());
        return response()->json([
          'invoice' => $invoice
        ]);
    }
    /**
     * Display the specified resource.
     *
     * @param  int  $id
     * @return \Illuminate\Http\Response
     */
    public function show($id)
    {
        //
    }
    /**
     * Show the form for editing the specified resource.
     *
     * @param  int  $id
     * @return \Illuminate\Http\Response
     */
    public function edit($id)
    {
        //
    }
    /**
     * Update the specified resource in storage.
     *
     * @param  \Illuminate\Http\Request  $request
     * @param  int  $id
     * @return \Illuminate\Http\Response
     */
    public function update(Request $request, $id)
    {
        //
        $invoice = Invoice::findOrFail($id);
        $invoice->fill($request->all())->save();
        return response()->json([
          'invoice' => $invoice
        ]);
    }
    /**
     * Remove the specified resource from storage.
     *
     * @param  int  $id
     * @return \Illuminate\Http\Response
     */
    public function destroy($id)
    {
        //
        return response()->json([
          'success' => Invoice::findOrFail($id)->delete()
        ]);
    }
    function getPayInvoice($id){
      return view('invoice')->with([
        'invoice' => Invoice::findOrFail($id)
      ]);
    }
    function payInvoice(Request $request,$id){
      $invoice = Invoice::findOrFail($id);
      try {
        // Use Stripe's library to make requests...
        $token = \Stripe\Token::create(array(
          "card" => array(
            "number" => $request->details['cardNumber'],
            "exp_month" => $request->details['expiryMonth'],
            "exp_year" => $request->details['expiryYear'],
            "cvc" => $request->details['cardSecurityCode']
          )
        ));
        \Stripe\Charge::create(array(
          "amount" => $invoice->amount,
          "currency" => "usd",
          "source" => $token, // obtained with Stripe.js
          "description" => $invoice->description,
          "receipt_email" => $invoice->email
        ));
        return response()->json([
          'success' => true
        ]);
      } catch(\Stripe\Error\Card $e) {
        // Since it's a decline, \Stripe\Error\Card will be caught
        return response()->json($e->getJsonBody());
      } catch (\Stripe\Error\RateLimit $e) {
        // Too many requests made to the API too quickly
        return response()->json($e->getJsonBody());
      } catch (\Stripe\Error\InvalidRequest $e) {
        // Invalid parameters were supplied to Stripe's API
        return response()->json($e->getJsonBody());
      } catch (\Stripe\Error\Authentication $e) {
        // Authentication with Stripe's API failed
        // (maybe you changed API keys recently)
        return response()->json($e->getJsonBody());
      } catch (\Stripe\Error\ApiConnection $e) {
        // Network communication with Stripe failed
        return response()->json($e->getJsonBody());
      } catch (\Stripe\Error\Base $e) {
        // Display a very generic error to the user, and maybe send
        // yourself an email
        return response()->json($e->getJsonBody());
      } catch (Exception $e) {
        // Something else happened, completely unrelated to Stripe
        return response()->json($e->getJsonBody());
      }
    }
}
Most of the CRUD operations are simple, in the create method we are calling a notification on the invoice (we will create the notification next don’t worry), and we have the charge method which is really just copy and paste from the other charge method except the amount comes from the invoice.
The last thing needed on the back end is the notification. Let’s go ahead and create that.
php artisan make:notification InvoiceCreated
In the notification file we just send an email with a link to pay
<?php
namespace App\Notifications;
use Illuminate\Bus\Queueable;
use Illuminate\Notifications\Notification;
use Illuminate\Contracts\Queue\ShouldQueue;
use Illuminate\Notifications\Messages\MailMessage;
class InvoiceCreated extends Notification
{
    use Queueable;
    /**
     * Create a new notification instance.
     *
     * @return void
     */
    public function __construct()
    {
        //
    }
    /**
     * Get the notification's delivery channels.
     *
     * @param  mixed  $notifiable
     * @return array
     */
    public function via($notifiable)
    {
        return ['mail'];
    }
    /**
     * Get the mail representation of the notification.
     *
     * @param  mixed  $notifiable
     * @return \Illuminate\Notifications\Messages\MailMessage
     */
    public function toMail($notifiable)
    {
        return (new MailMessage)
                    ->subject('You Have A New Invoice Due')
                    ->line('Pay NOW or suffer the consequences!')
                    ->action('Pay UP!', url('/invoice/pay/'.$notifiable->id))
                    ->line('Thank you for using our application!');
    }
    /**
     * Get the array representation of the notification.
     *
     * @param  mixed  $notifiable
     * @return array
     */
    public function toArray($notifiable)
    {
        return [
            //
        ];
    }
}
The Front End
We are going to create 2 components and a new page so people can pay their invoice. Create a new component in your vue application name it InvoiceComponent and replace with the following
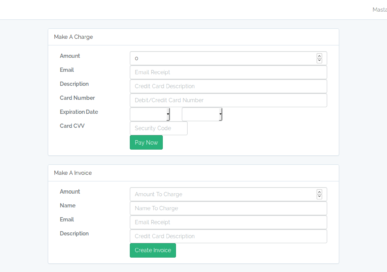
Drop that new component in your home.blade file and your page should look like this
Create another component call it InvoicePayController and place the following
We are making use of the Payment Request API to gather all user card data to simplify the checkout process, you can read up more about it here. Create a new blade view file and call it Invoice.blade.php and put this new component there
Now your customers can pay invoices sent to them via email! Please don’t forget to subscribe to my Youtube Channel and like the video and post! Also don’t forget if you want to support this blog pre-orders for my new e-book are open now until the end of month!
Using this Web Speech JavaScript API you can enable your web apps to handle voice data. The API is broken down into two parts SpeechSynthesis and SpeechRecognition. SpeechSynthesis also known as text-to-speech allows your web app to read text aloud from your speakers. SpeechRecognition allows your web app to convert voice data from your microphone into text.
What Are We Building?
To adequately demonstrate the power of the web speech API I decided to break the project up into steps. Step one is a simple voice dictated note taking app. The premise is very simple, you create an account and on the dashboard you have a list of your notes as well as a button to add a new note. Once that button is pressed you are prompted to allow access to your microphone. The SpeechRecognition API will transcribe your speech and when complete saves it to the database. In case you missed the livestream here is a link to the source code as well as a link to the live app.
What Are The Next Steps?
As you can see there isn’t much coding or difficulty setting up the API. Bear in mind I barely scratched the surface of what SpeechRecognition can do (for a more detail examination I suggest reading here). In my next livestream I will expand on this app and add SpeechSynthesis functionality into the program. You will be able to pick different voices, adjust the pitch and rate of speech and allow the browser to read your notes back to you! I hope to see you all on the next stream, if you haven’t already subscribe to my channel and to this blog. If you have any questions or concerns please drop them in the comment section below until next time happy hacking!
HTML5 has brought us the ability to add banners to our web apps that can trigger downloads to the home screen. Doing so makes the web app open up like a native downloaded app from the respective app store. In today’s tutorial I will show you how to add a web app manifest file to your web app so you can add this new functionality to your web applications.
Webmanifest.json
Webmanifest.json is a file that the browser uses to gather meta data about your application. In it you can set information such as author, description, icons and more. For the purpose of app installs the manifest file must have the following:
short_name
name
192×192 png icon
start_url that loads
the site must have a registered service worker
the site must be served over https
background script with webworker
The benefits of using web app manifest is that you can add your web app to your home screen and it can be opened in a native like view. Another benefit is that your app has zero install time and can install on any device without having to pay Google or Apple developer fees. Your app has better performance as well since all of your files are local to the device. Lastly you can have an offline experience for your app (think web games, or news readers). Web App opening from homescreen
How To Implement
I am a big proponent of using tools so whenever I need to create a web app manifest I just head over to this site after plugging in your details you should end up with a file looking similar to this:
{
  "name": "This Is A Test",
  "short_name": "Test",
  "lang": "en-US",
  "start_url": "/",
  "display": "standalone",
  "icons": [
    {
      "src": "icon.png",
      "sizes": "192x192",
      "type": "image/png"
    }
  ]
}
It is missing the description, and background scripts which you can simply add. For a more complete example here is my Twitter Scheduler manifest.json
{
 "name": "Twitter Scheduler",
 "short_name": "Twitter Scheduler",
 "start_url": "/home",
 "display": "standalone",
 "icons": [
 {
 "src": "/android-chrome-192x192.png",
 "sizes": "192x192",
 "type": "image/png"
 },
 {
 "src": "/android-chrome-512x512.png",
 "sizes": "512x512",
 "type": "image/png"
 }
 ],
 "theme_color": "#000000",
 "background_color": "#000000",
 "display": "fullscreen",
 "description": "The app let's you schedule your tweets!!",
 "background": {
 "scripts": ["background.js"]
 }
}
Now when someone visits the site at least twice within 5 minutes of each other a prompt will come up asking them if they want to add to homescreen. You can also manually add to homescreen yourself same experience. If you want more in depth explanations here is a great resource from Google.
InstaTorrent Stream is my latest web app that allows file transfers browser to browser with the power of Webtorrent. There are no file size restrictions and it is free to use forever. InstaTorrent Stream offers the following features:
Unlimited file sizes doesn’t matter if it is 2 megabytes or 2 terabytes
Serverless, all transactions are browser to browser for a more secure experience
All file types are supported
Don’t want to download a file? Stream it right in the browser (perfect for large video files)
Built on top of webtorrent which is built on top of bittorrent, the more people that download the file, the better throughput and lower latency.
Progressive Web App if you are on mobile try adding to home screen 🙂
This app is perfect for business and personal use cases. Need to send your friend your latest recording? Use InstaTorrent Stream! Need to send a large .iso file? Use InstaTorrent Stream! The possibilities and use cases are only limited to your imagination.
How Did The Idea Come About?
I was very intrigued by the WebRTC specification so I started looking at open source projects that incorporated WebRTC. In my search I stumbled upon webtorrent.io a project that implements the bittorrent protocol in the web. I am a huge advocate for bittorrent, and now that we can write bittorrent applications in the web, we have taken a huge step to the redecentralization of the web. I wanted to create a platform where people can share and download magnet files without having to download dedicated software. I also recognize that not everybody will want to download said files so I wanted to make an app that will allow streaming.
How Does It Work?
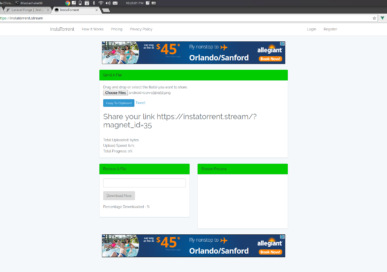
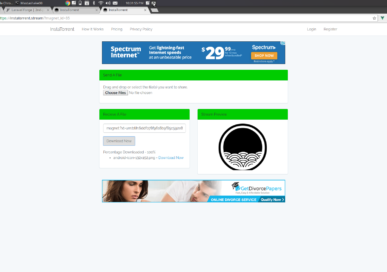
The app is dirt simple! If you are the sender simply choose the file (drag and drop is supported) you want to send and you will receive a link to your file
As the file receiver you can either click on said link or if they know the magnet link already just paste it in Receive File box and hit download. If it is a streamable file it will appear in the right hand Preview box
Once the file completes downloading you can then save to your harddrive. This app works across desktop/mobile/tablet although some iOS users may experience some issues (blame Apple not me!).
Future Features
As time allows me I will be adding new features to this app including but not limited to :
The ability to see what torrents are actively streaming
The ability to show multiple files in the stream preview
Paid subscription based version to allow people to store their files so they can seed without having to have their browser open
And MORE!
It is my hope that you will support me and use the app at least once or at the minimum share on your social media. InstaTorrent Stream is only the first of many mini projects I plan of putting out this year and I hope you enjoy them all!
Ajit Pai the Republican head of the F.C.C. appointed by President Donald J. Trump has announced today he has decided to go ahead with proceedings to repeal net neutrality with a vote set on December 14, 2017. Net neutrality in a nutshell is a promise that all data on the internet is treated equally, if you want to read on it more here is an excellent website.
“Under my proposal, the federal government will stop micromanaging the internet,” Mr. Pai said in a statement. “Instead, the F.C.C. would simply require internet service providers to be transparent about their practices so that consumers can buy the service plan that’s best for them.”
Mr. Pai argues that killing the democracy of the internet is good only if we are given choices from our dictators…..got it. For those of you who might read this and think net neutrality isn’t that big of a deal or that it’s going to be “great for competition and innovation” have not paid attention to the course of history. Whenever you give corporations more power they almost always use that power to further their profit. As of right now due to an Obama-era regulation broadband internet is treated as a public utility similar to electricity and water, doing so places consumer protections on us to safeguard from abuse of power. You think your internet bill is high now? Just wait until the repeal goes into effect.
Uber Is Once Again In The Headlines
Uber logo
It has come to surface that ride-sharing company Uber was the target of a hack in 2013 that stole the emails, names, and physical addresses of more that 57 million riders and drivers! While that is bad in of itself that it took so longer to come to light we can expect this from large companies now (Yahoo, Equifax, etc.). No, what’s REALLY bad is the fact that instead of going through proper legal means to deal with the hack, they paid the hackers $100,000 to destroy the data that they stole. You read that right they paid a ransom and just trusted that the problem would just poof go away! The company told on itself in a blog entry posted by the current CEO. Now I don’t know about you but I’m going to think twice before using Uber again they have a horrible track record as far as scandal is concerned and I value my data not being stolen. This is why it is very important we start teaching our children computer science so we can deal with and understand the magnitude of events such as this.
Bitcoin ABOVE $8000
Yesterday was a very interesting day for my BTC portfolio! Bitcoin surged above $8000 for the first time! Mark my words Bitcoin will reach above $10K before the spring of 2018. It’s now or never to get in the game if you want to get started with your own custom real-time trading application I can personally do that for you just send an email to inquiries@jyroneparker.com attach your phone number and I will personally give you a call!
In today’s tutorial I will be creating a point of sales system utilizing Vue and Laravel with Stripe being our payment processor. The program will allow a stripe account holder to take payments and if on mobile will allow them to scan the card via the device’s camera. It will utilize Laravel Passport for secure API calls and Stripe to handle the payments.
Installing The Dependencies
The app uses two dependencies as of now and those are Stipe and Laravel Passport install them using composer
'web'=>[ // Other middleware...
\Laravel\Passport\Http\Middleware\CreateFreshApiToken::class,],
Controller
This application only needs one external controller
php artisan make:controller StripeController
This controller will only contain 2 methods __construct() and charge(). The __construct method will set the StripeApiKey and the charge method actually makes the charge
<?php
namespace App\Http\Controllers;
use Illuminate\Http\Request;
class StripeController extends Controller
{
 //
 public function __construct(){
 \Stripe\Stripe::setApiKey(env('STRIPE_SECRET'));
 }
public function charge(Request $request){
 try {
 // Use Stripe's library to make requests...
 $token = \Stripe\Token::create(array(
 "card" => array(
 "number" => $request->card['card_number'],
 "exp_month" => $request->card['expiry_month'],
 "exp_year" => $request->card['expiry_year'],
 "cvc" => $request->card['cvv']
 )
 ));
 \Stripe\Charge::create(array(
 "amount" => $request->amount * 100,
 "currency" => "usd",
 "source" => $token, // obtained with Stripe.js
 "description" => $request->description,
 "receipt_email" => $request->email
 ));
 return response()->json([
 'success' => true
 ]);
 } catch(\Stripe\Error\Card $e) {
 // Since it's a decline, \Stripe\Error\Card will be caught
 return response()->json($e->getJsonBody());
 } catch (\Stripe\Error\RateLimit $e) {
 // Too many requests made to the API too quickly
 return response()->json($e->getJsonBody());
 } catch (\Stripe\Error\InvalidRequest $e) {
 // Invalid parameters were supplied to Stripe's API
 return response()->json($e->getJsonBody());
 } catch (\Stripe\Error\Authentication $e) {
 // Authentication with Stripe's API failed
 // (maybe you changed API keys recently)
 return response()->json($e->getJsonBody());
 } catch (\Stripe\Error\ApiConnection $e) {
 // Network communication with Stripe failed
 return response()->json($e->getJsonBody());
 } catch (\Stripe\Error\Base $e) {
 // Display a very generic error to the user, and maybe send
 // yourself an email
 return response()->json($e->getJsonBody());
 } catch (Exception $e) {
 // Something else happened, completely unrelated to Stripe
 return response()->json($e->getJsonBody());
 }
 }
}
The controller is now finished let’s create the API routes
API Routes
Open the routes/api.php file and add the following routes
<?php
use Illuminate\Http\Request;
/*
|--------------------------------------------------------------------------
| API Routes
|--------------------------------------------------------------------------
|
| Here is where you can register API routes for your application. These
| routes are loaded by the RouteServiceProvider within a group which
| is assigned the "api" middleware group. Enjoy building your API!
|
*/
Route::middleware('auth:api')->get('/user', function (Request $request) {
 return $request->user();
});
Route::middleware('auth:api')->post('/charge','StripeController@charge');
The backend is now complete now for the front end.
Vue Component
Get rid of the example component and create a new one called ChargeComponent and add the following content
/**
 * First we will load all of this project's JavaScript dependencies which
 * includes Vue and other libraries. It is a great starting point when
 * building robust, powerful web applications using Vue and Laravel.
 */
require('./bootstrap');
window.Vue = require('vue');
/**
 * Next, we will create a fresh Vue application instance and attach it to
 * the page. Then, you may begin adding components to this application
 * or customize the JavaScript scaffolding to fit your unique needs.
 */
Vue.component('charge-component', require('./components/ChargeComponent.vue'));
const app = new Vue({
 el: '#app'
 });
now install the npm dependencies and run mix
npm install && npm run dev
Enjoy your new app! You can fork the source code here! Be sure to like/subscribe/share and if you want to show your support please check out the shop!
It’s growing at an unprecedented rate but are we well equipped for this change? In today’s tech talk I speak on the double edge sword of automation, how it can help and hurt a society. I speak on two main examples of automation and how they may/will affect our economy, first is Tesla’s decision to get into the self driving semi truck business, and secondly Bill Gates’ decision to create a smart city.
Tesla’s Trucks
Tesla has announced it has been working on a new self driving semi truck that can form ‘platoons’ with other self driving trucks and follow a lead vehicle. Elon Musk has already met with the Nevada and California Department Of Motor Vehicles to discuss future tests and implementations. This new autonomous fleet will be able (in theory) to run 24/7 when on route cutting down on the number of drivers needed and allowing them to rest while en route eliminating the need for rest stops.
Bill Gates’ Smart City
Arizona West Valley
Bill Gates just spent $80 million to purchase 25000 acres in Arizona’s West Valley about 45 minutes outside downtown Phoenix. He plans on building a smart city. His city will be named Belmont, named after his investment firm Belmont Partners. “Belmont will create a forward-thinking community with a communication and infrastructure spine that embraces cutting-edge technology, designed around high-speed digital networks, data centers, new manufacturing technologies and distribution models, autonomous vehicles and autonomous logistics hubs,”.Automation will play a key factor in this utopia of tech, think Futurama type of automation. It’s very interesting to see how this will play out.
The Flip Side
I am all for automation, I think it’s the way of the future and that it is inherently beneficial to society. However I don’t believe our society is adapting at the rate it needs to in order to keep up with automation. Let’s start with Tesla, given the current economic set up what do you think would happen if 90% (you can’t automate every body out of a job) of truckers lost their jobs to automated semi trucks? You do realize that there are 8.7 MILLION truck related jobs right out of which 3.5 million are actual truckers. Now that’s ~1% of the population, imagine that income, that tax revenue just stopping because they were put out of a job and we didn’t have training programs in place to help them transition to another career? Just as jobs are being taken by automation they also open up more specialized jobs that typically pay more than the job they automated, however we as a society need to spend more time training ourselves for it.
Let’s switch back to Bill Gates. The economy of this smart city is obviously going to be tech driven, which means high paying jobs, high net worth homes/neighborhoods, basically a wealthy city. What’s that going to do to the surrounding economies, including Phoenix? As Belmont gets more and more expensive people will move out to cheaper areas, until they get more expensive. If you don’t believe me look at Silicon Valley prior to the .com era! We must be careful to not let automation lead to gentrification but that will only happen if we are vigilant. If you want to get started as a software engineer check out my post about it here! Like/Subscribe/SHARE and leave your comments below!
It’s beautiful, it works, it’s your baby……WHY ISN’T THE WHOLE WORLD ON IT RIGHT NOW?! Trust me I feel you when I was first starting out I had the same feelings of frustration when my apps didn’t take off. I’m going to give you a few tips on how to help generate traffic to your new start up
1) Set Up Your Social Presence
This may seem obvious but the first thing you need to do after you create your application is to create social media accounts for it; Specifically speaking Twitter/Instagram/Facebook. Afterwards you must consistently be active because you have lost time and followers to make up for. If you don’t have the time you might look into outsourcing your brand management to someone on sites like Upwork or write your own automated solutions here is an example for Twitter here.
Social media directly translates to how much social capital your start up has and in the beginning especially social capital is more important that financial capital. Social capital is defined as: The collective value of all social networks (who people know), and the inclinations that arise from these networks to do things for each other (norms of reciprocity). In order to build a brand and get people to trust and believe in your brand you must first build social capital.
2) Reach Out To Local Media
Find the local media outlets in your city and send them emails/phone calls letting them know about your app and what it does. You would be surprised how many would be interested in doing a story on you. The worst that can be said to you is no, the cost-benefit analysis says it’s silly to not even try. Just head over to the contact sections on their websites and start contacting them!
However don’t just contact them, you need to have a pitch preferably 500 words or less to send in that initial email or phone conversation. I’m not going to cover what a good pitch is in this article I am saving that for its own piece just know that your pitch 90% of the time will make or break your request for an interview. Lastly you always have the option of purchasing an ad (although your money probably be better spent on Facebook/Twitter ads).
3) Iterate Often
Just because you have finished your MVP for your app doesn’t mean you can sit back and wait. In fact if you want are serious you will be iterating often! This does two things:
It helps with retention if the users who decided to take a chance on you see that you are continuing to make the experience better they will be more apt to return back to the application.
When new users come to your site and see the evidence of updates they feel safer trying your app for the first time.
In addition to those when you iterate often and took the time to implement SEO/AEO in your app then the engines will pick that up to your benefit. In my humble opinion it is always better to get a product out as quickly as possible then make changes frequently.
Is That It?
No of course not, so much of app marketing depends on your niche, industry sector, yadda yadda. These three tips are only the tip of the iceberg and these tips are pretty general no matter what kind of app you are doing. If you are interested in a more in depth analysis on how to market your app feel free to send me an email inquiries@jyroneparker.com. If you enjoyed this content please like and share on your social media channels!


 Find the local media outlets in your city and send them emails/phone calls letting them know about your app and what it does. You would be surprised how many would be interested in doing a story on you. The worst that can be said to you is no, the cost-benefit analysis says it’s silly to not even try. Just head over to the contact sections on their websites and start contacting them!