Jyrone Parker is an American software engineer and entrepreneur from Louisville, KY. He is the owner and CEO of J Computer Solutions LLC, a full-scale IT agency that deals with hardware, networking, and software development. He is also a tech rapper and producer that goes by the name Mastashake.
Your Continuous Integration Architecture Is Just As Important As Your Software Architecture
This is something that I learned when I was a senior software devops engineer at Apple (yes that is the exact title, it was a hybrid role). This was the first time that I was really introduced to the concept of continuous integration and I was amazed at how intricate and complex the setup at Apple was. When I left Apple in 2015 I had a thorough understanding of CI/CD and understood its importance, however I was convinced that it was really only useful and worthwhile to big corporations and I as a solo developer do not need to implement such pipelines into my small applications. I changed that mode of thinking a couple of years ago and today I will explain to you why it is important for you to implement CI in your projects as early as possible. Even simple apps such as this one has a basic CI/CD pipeline set up.
You Might Be Wondering…What Is Continuous Integration
For all my non devops folks reading this….which is most of you, you may be wondering what is continuous integration? Well here is one definition
Continuous Integration (CI) is the process of automating the build and testing of code every time a team member commits changes to version control.
Definition of continuous integration provided by Microsoft
Basically it is your setup that prevents your production app from crashing and burning if you or a team member accidentally commits crap code. Usually it goes something like this: You push some code to master, you have a service (Jenkins for example) run some tests everytime new code is pushed to master. If the tests succeed, then pull the latest code on production server from master. If the tests fails, email whoever needs to be emailed (or Slack or pigeon carrier idc).
What Benefit Is It To A Solo Dev?
So you may be reading this and thinking the same thing I thought. This is awesome if you have a ton of developers working on code, but isn’t it overkill for just one person? I can just write and test the code myself? This is true that you CAN but think about this.
1) Save Time
Instead of manually running each test and wasting time waiting for output, you can delegate that busy work to your servers, those 30 sec – 5 min wait times for testing do add up over time. That’s time that can be used to build features.
2) Safely Scale Development
You may be a solo developer now, but perhaps you want to make your source code open source to allow more developers to help you out. Let’s say you end up getting 20 developers putting in weekly consistent work. With a solid continuous integration pipeline you can have them commit code, it runs the tests, merges into master and deployed to production without you having to manually approve and check each PR. This level of automation allows more time and resources to go into the actual application.
3) Keep A Clean Healthy Production App
If continuous integration is set up correctly then you should always have a clean solid production facing application. You can sleep easy at night knowing your app will never go down just because someone committed an extra semicolon or lack thereof.
If You Aren’t Using CI/CD You Are Setting Yourself Up For Failure
I use continuous integration in all of my personal projects/apps and if I am working on a client application and it doesn’t have CI, that is the first thing that I implement. Eventually sooner or later there will be bad code committed to your repository and if you are not setting up an apparatus to catch that, then it is only a matter of time before your application will crash in production for untested code. Don’t set yourself up for failure it’s much simpler and easier to set it up in the beginning of a project than at the middle or the end. Save yourself time, energy and money.
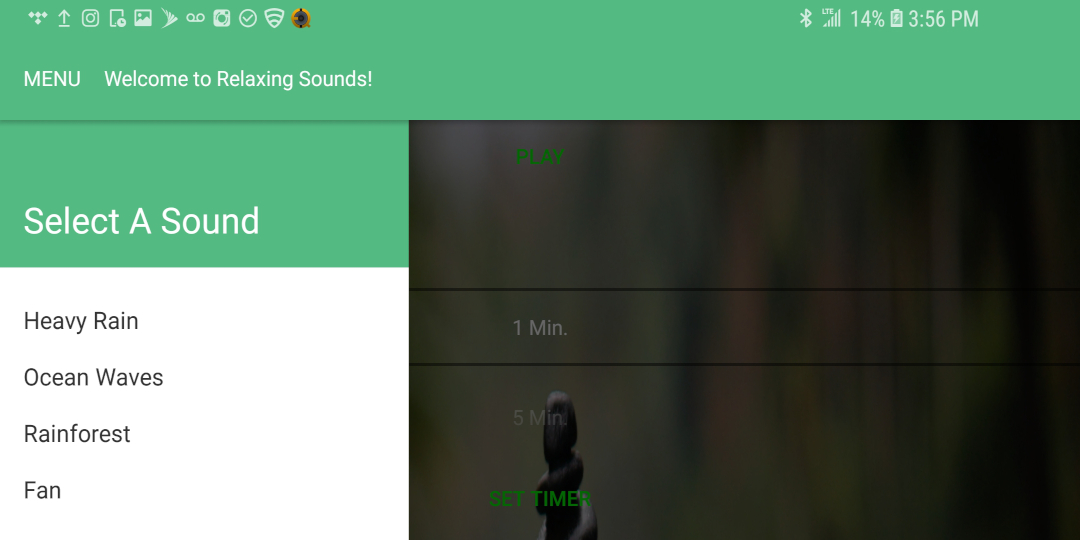
Two days ago I put out Relaxing Sounds. RS is a android(soon to be iOS) productivity application that plays various white noise sounds like thunderstorms and ocean waves. I wrote this app using Nativescript and Vue.js in a matter of 3 hours. Now keep in mind:
This is a simple app.
I just wanted to get my hands dirty with the core framework and have something to show for it.
I integrated admob and created a free and a pro version with plans to update the application to include a relaxing sounds livestream for 24 hr continuous new calming content. I was blown away by how fast I was able to transition from the DOM to Nativescript XML. If you don’t know anything about Nativescript then check out my blog post about it.
How Did I Write It So Fast?
Well once I understood the Nativescript system (which in itself only took a couple hours to understand and master) it was just a simple matter of how well do I know Vue.js? That’s the beauty of Nativescript! It abstracts the headache of interacting with the native hardware so your mind can stay in a purely web development mode. If you can write a PWA with Vue.js then you can write a truly native mobile application with Vue.js there really isn’t any excuse. Couple Nativescript with Vue.js and Laravel for your backend API and you can be a one man (or woman) code army.
Why Did I Write Relaxing Sounds?
I have always been a fan of using calming distracting audio; Whether it be while I code, sleep, meditate or study. I have downloaded apps in the past that have provided that functionality but for one reason or another I deleted them. So to remedy the problem I just wrote my own application.
What Are My Future Plans For RS?
Really after my next release to add the livestream I don’t plan on giving it much attention development wise. I will study the analytics and create a marketing campaign if the data says it is worth it. Otherwise it is just another notch on my project belt and I will continue to use for my own personal enjoyment. If you want to support me then please download my application and rate it with comments! If you really enjoy it then I ask that you purchase the pro version for $1.99.
Last night I went live on my multicast server. Facebook was good, Twitch was good but Youtube was not. I was perplexed so I attempted to pull up my creator studio page but Youtube wouldn’t pull up. My suspensions were rising because there was announcements of scheduled maintenance. Couple that with the fact that systems like Youtube are designed to NEVER go down (hello redundancy). I just decided to stream on the other platforms and upload my video whenever the Youtube outage was over.
The world though the Apocalypse was near when YouTube went down.
Eventually Youtube recovered and came back up towards the end of my stream but it really worried me. I believe we as a populace need to consider the possibility that they were the target of a sophisticated hack. As I said before in the paragraph above systems like Youtube are designed to NEVER go down. Google pays millions of dollars a year to hire the world’s best site reliability engineers, no, this was something more than a simple outage.
Cyber Warfare At Its Finest
I have spoken many times in the past on how the United States is not where it needs to be in terms of cyber infrastructure. Many of our government systems are using outdated software and our education system does not place a high emphasis on computer science. We may have the strongest military in the world but what does that mean in an era where an adversary can shut down your power grid or blow up a nuclear reactor from across the globe? Personally I believe it was the same forces who infiltrated our media and influenced our elections. This was a psychological test. Across the world people were freaking out.
Whether we want to admit it or not YouTube is a vital system that the world relies on. They have the some of the strongest security measures on the planet. If they can be hacked and taken offline for one hour, then who is next? What happens when Facebook is taken down? All I know is that the thoughts of what could and would happen terrify me.
Nativescript is a new javascript framework that allows you to create TRULY native mobile apps using the V8 engine and JavascriptCore engine for Android and iOS respectively. Using Nativescript you can create the mobile app of your dreams using the web technologies you already know and love.
How Did You Hear About It?
It’s funny actually. Last year I was reading documentation on Laravel’s website and saw an ad for Nativescript. It intrigued me so I decided to click the ad and instantly was glad I did. Although the project looked very promising, the Vue.js integration wasn’t complete yet and I wasn’t interested in going back to Angular so I left it alone. A few months later nativescript-vue was released and I came running back.
What Are The Advantages To Using Nativescript?
Well the first one is that you actually get native performance. This isn’t like Ionic or Cordova where your web app is hosted in a WebView running inside an app container. This is actual transpiled code from web technologies to mobile technologies.
Low learning curve. Since you can develop using Vue and all Vue extensions there is no extra learning curve as far as syntax is concerned. Just setup the environment and you are ready to turn your web applications into native mobile applications. If you want an intro to Vue.js check out my video course.
Extensive marketplace. The Nativescript ecosystem allows developers to create packages and are managed by npm. Easily extend the functionality of your mobile applications.
It’s FREE. Nativescript is free and open source to use for free and commercial use and has an Apache 2 license.
Want A More In Depth Explanation?
Watch my Youtube video and learn more about the power of Nativescript and even start on an example mobile application! Don’t forget to like and share the video and subscribe to my channel!
I Want To Quit My Job And Work Full Time On My App!
This is the number one comment I receive from app entrepreneurs. Many people have read my article describing my decision to pursue residual income full time and want to live that same lifestyle. I understand the allure and the desire for this however I always give them the same answer…it depends. In my most recent Tech Talk I discussed what those variables are but here is a synopsis.
How Much Do You Make A Year?
This is the first question I ask aspiring app entrepreneurs. Your lifestyle always adjusts depending on your income. With that being said if you make $100,000 USD a year and you have an app that makes $50,000 a year it might not make sense to quit your main gig just yet IF that $50,000 cannot provide the same standard of living that you are currently living.
What Is Your App’s Time/Income Ratio?
Back to the concept of app income, one of the next questions I ask app entrepreneurs is “What is your app’s time/income ratio?”. Meaning how much time are you having to put in to this app to generate the income you are receiving. Going back to the example of making $50,000 a year from one of your apps, if you have to spend 200 hrs/week just to maintain that $50,000 then it might make more sense to keep your $100,000 main gig and outsource development for your app (let’s say $10,000) and collect the rest and supplement income.
What Is The Life Expectancy Of The App?
Not all applications are meant to be around long term. If your app isn’t going to be around for more than 5-10 years. Don’t quit your main gig, it just does not make sense. There is ONE exception and that is if your app is making crazy amounts of money like Flappy Bird money
For A More In Depth Discussion Check Out The Tech Talk
Don’t forget to join my Tech Talk live broadcasts on Tuesdays and Thursdays and join the conversations in real time! If you enjoyed this content like and share this video and subscribe to my Youtube channel!
Encryption is the best tool in this fight for your right to privacy. Now more than anytime in history privacy is of the essence. In today’s tutorial I will show you how to create a simple messenger service in Laravel and Vue.js; however they will be password protected and encrypted therefore the receiver must know the password beforehand to read the message. All code can be found on my Github repo.
Setting Up The Backend
The application itself has only one model and that is the Message model. It has 3 properties: content, email and passphrase. The content stores the encrypted message. The email is the email address of who is receiving the message. Finally the passphrase is the password that protects the message from being opened by anybody.
php artisan make:model -m Message
Open the Message.php file and make it Notifiable and change the $fillable
<?php
namespace App;
use Illuminate\Notifications\Notifiable;
use Illuminate\Database\Eloquent\Model;
class Message extends Model
{
use Notifiable;
//
public $fillable = ['content','passphrase','email'];
}
Next open up the migration file that was created with the model and add the following:
<?php
use Illuminate\Support\Facades\Schema;
use Illuminate\Database\Schema\Blueprint;
use Illuminate\Database\Migrations\Migration;
class CreateMessagesTable extends Migration
{
/**
* Run the migrations.
*
* @return void
*/
public function up()
{
Schema::create('messages', function (Blueprint $table) {
$table->increments('id');
$table->longText('content');
$table->string('passphrase');
$table->string('email');
$table->timestamps();
});
}
/**
* Reverse the migrations.
*
* @return void
*/
public function down()
{
Schema::dropIfExists('messages');
}
}
Next create the controller. This controller will be RESTful with an extra method for decrypting the messages.
Open the file and fill in the methods store(), show() and decrypt()
<?php
namespace App\Http\Controllers;
use Illuminate\Http\Request;
use App\Message;
use App\Notifications\MessageCreated;
use Illuminate\Contracts\Encryption\DecryptException;
class MessageController extends Controller
{
/**
* Display a listing of the resource.
*
* @return \Illuminate\Http\Response
*/
public function index()
{
//
}
/**
* Show the form for creating a new resource.
*
* @return \Illuminate\Http\Response
*/
public function create()
{
//
}
/**
* Store a newly created resource in storage.
*
* @param \Illuminate\Http\Request $request
* @return \Illuminate\Http\Response
*/
public function store(Request $request)
{
//
$message = Message::Create([
'content' => encrypt($request->content),
'passphrase' => encrypt($request->password),
'email' => $request->email
]);
$message->notify(new MessageCreated($message));
return response()->json($message);
}
/**
* Display the specified resource.
*
* @param int $id
* @return \Illuminate\Http\Response
*/
public function show($id)
{
//
$message = Message::findOrFail($id);
return view('message')->with([
'message' => $message
]);
}
public function decrypt(Request $request, $id){
try{
$message = Message::findOrFail($id);
if($request->password == decrypt($message->passphrase)){
$message = decrypt($message->content);
$with = [
'message' => $message
];
return response()->json($with);
}
}
catch (DecryptException $e){
return response()->json($e);
}
}
/**
* Show the form for editing the specified resource.
*
* @param int $id
* @return \Illuminate\Http\Response
*/
public function edit($id)
{
//
}
/**
* Update the specified resource in storage.
*
* @param \Illuminate\Http\Request $request
* @param int $id
* @return \Illuminate\Http\Response
*/
public function update(Request $request, $id)
{
//
}
/**
* Remove the specified resource from storage.
*
* @param int $id
* @return \Illuminate\Http\Response
*/
public function destroy($id)
{
//
}
}
As you can see there is a call to a notification that has not been created yet so create it
php artisan make:notification MessageCreated
Open that up and replace it with the following which will call the toMail method and alert the recipient they have a new message to view
<?php
namespace App\Notifications;
use Illuminate\Bus\Queueable;
use Illuminate\Notifications\Notification;
use Illuminate\Contracts\Queue\ShouldQueue;
use Illuminate\Notifications\Messages\MailMessage;
class MessageCreated extends Notification
{
use Queueable;
public $message;
/**
* Create a new notification instance.
*
* @return void
*/
public function __construct(\App\Message $message)
{
//
$this->message = $message;
}
/**
* Get the notification's delivery channels.
*
* @param mixed $notifiable
* @return array
*/
public function via($notifiable)
{
return ['mail'];
}
/**
* Get the mail representation of the notification.
*
* @param mixed $notifiable
* @return \Illuminate\Notifications\Messages\MailMessage
*/
public function toMail($notifiable)
{
return (new MailMessage)
->line('You have a new encrypted message.')
->line('You should have been given the passphrase')
->action('Decrypt and Read Now!', url('/message/'.$this->message->id))
->line('Thank you for using our application!');
}
/**
* Get the array representation of the notification.
*
* @param mixed $notifiable
* @return array
*/
public function toArray($notifiable)
{
return [
//
];
}
}
Lastly the api and web routes need to be updated
In web.php
<?php
/*
|--------------------------------------------------------------------------
| Web Routes
|--------------------------------------------------------------------------
|
| Here is where you can register web routes for your application. These
| routes are loaded by the RouteServiceProvider within a group which
| contains the "web" middleware group. Now create something great!
|
*/
Route::get('/', function () {
return view('home');
});
Route::get('/home', 'HomeController@index')->name('home');
Route::get('/message/{id}','MessageController@show');
In api.php
<?php
use Illuminate\Http\Request;
/* |-------------------------------------------------------------------------- | API Routes Fr */
Route::middleware('auth:api')->get('/user', function (Request $request) { return $request->user(); });
Route::resource('/message','MessageController');
Route::post('/decrypt-message/{id}','MessageController@decrypt');
Lastly let’s create the view files. As a shortcut I scaffold authentication even though we aren’t using it to get the bootstrap layouts and the home.blade.php file. Copy the home.blade.php file to another file called message.blade.php.
In home.blade.php
The Vue.js side of things is pretty simple there are two components a MessageSend and a MessageRead. Create a file in your resources/assets/js/components folder called MessageSend.vue and MessageRead.vue.
In your resources/assets/js/app.js file don’t forget to add your components
/**
* First we will load all of this project's JavaScript dependencies which
* includes Vue and other libraries. It is a great starting point when
* building robust, powerful web applications using Vue and Laravel.
*/
require('./bootstrap');
window.Vue = require('vue');
/**
* Next, we will create a fresh Vue application instance and attach it to
* the page. Then, you may begin adding components to this application
* or customize the JavaScript scaffolding to fit your unique needs.
*/
Vue.component('send-message', require('./components/MessageSend.vue'));
Vue.component('read-message', require('./components/MessageRead.vue'));
const app = new Vue({
el: '#app'
});
In this segment we explore the stripe product and sku apis. This allows us to do inventory management inside of our app. For the full source code go here.
Xiaolang Zhang Was Trying To Get A Job At Xiaopeng Motors
Xiaopeng Motors G3 Model
What better way to get a job at a hot Chinese tech autonomous vehicle start up than by stealing/giving 40GBs worth of proprietary data from Apple’s autonomous car division to said company? Well that is exactly what Xiaolang Zhang did and he likely will do 10 years federal time for it. According to an article from The Verge Xiaolang Zhang worked for Apple from December 2015 until May 2018 and has been arrested over the past weekend trying to flee the country. In April of this year Xiaolang Zhang returned back to Apple from a month long paternity leave to inform Apple that he was quitting and moving back to China to take care of his ailing and sick mother. Afterwards he told his supervisors that he planned on working for Alibaba-backed start up Xiaopeng Motors.
Apple Thought The Timing Was Supicious
Apple Headquarters
The timing and revelation that Xiaolang Zhang was leaving to go to Xiaopeng Motors made Apple suspicious and rightfully so. They audited his work computer and work devices and discovered that his network activity had spiked exponentially in the time leading up to his quitting. When looking further it was discovered that 40GBs worth of data had been copied onto his local device and air dropped to his wife (of which 60% was deemed critical and concerning). CCTV footage also showed Xiaolang Zhang stealing cables and computers from the Apple campus. Apple alerted the FBI who then got a search warrant for Xiaolang Zhang’s home. They raided his home on June 27th, 2018 and Zhang told them what he had told Apple. He was arresting after the FBI learned he bought a round trip ticket from San Jose, California to Beijing, China. He was arrested at the security checkpoint.
Who Is Xiaopeng Motors
Guangzhou Xiaopeng Motors Technology, or known simply as Xpeng, was founded in 2014 by mobile internet entrepreneur He Xiaopeng. This company is backed by Alibaba (think of them like the Amazon of China). Both are seen as major competitors to Apple, Google and other tech companies in the autonomous vehicle sector. For a more detailed breakdown of this incident watch my #TechTalk on it below and don’t forget to like this video, leave comments and subscribe! Enjoy this #TechTalk support the site by visiting the shop.
In part 4 we add recurring billing to our point of sales system by utilizing Stipe Subscriptions. Subscriptions in conjunction with our customers created in part 3 allows for easy tracking of expenses and opens the way for residual income. Next up we add inventory management to the system! For the source code click here and don’t forget to subscribe to the YouTube channel!
In the previous segment we set up the Stripe webhooks so that Stripe can interact with our system asynchronously. Today we implement Stripe customers in our platform. For all source code check here. In the next post we introduce recurring billing.