I Want To Quit My Job And Work Full Time On My App!
This is the number one comment I receive from app entrepreneurs. Many people have read my article describing my decision to pursue residual income full time and want to live that same lifestyle. I understand the allure and the desire for this however I always give them the same answer…it depends. In my most recent Tech Talk I discussed what those variables are but here is a synopsis.
How Much Do You Make A Year?
This is the first question I ask aspiring app entrepreneurs. Your lifestyle always adjusts depending on your income. With that being said if you make $100,000 USD a year and you have an app that makes $50,000 a year it might not make sense to quit your main gig just yet IF that $50,000 cannot provide the same standard of living that you are currently living.
What Is Your App’s Time/Income Ratio?
Back to the concept of app income, one of the next questions I ask app entrepreneurs is “What is your app’s time/income ratio?”. Meaning how much time are you having to put in to this app to generate the income you are receiving. Going back to the example of making $50,000 a year from one of your apps, if you have to spend 200 hrs/week just to maintain that $50,000 then it might make more sense to keep your $100,000 main gig and outsource development for your app (let’s say $10,000) and collect the rest and supplement income.
What Is The Life Expectancy Of The App?
Not all applications are meant to be around long term. If your app isn’t going to be around for more than 5-10 years. Don’t quit your main gig, it just does not make sense. There is ONE exception and that is if your app is making crazy amounts of money like Flappy Bird money
For A More In Depth Discussion Check Out The Tech Talk
Don’t forget to join my Tech Talk live broadcasts on Tuesdays and Thursdays and join the conversations in real time! If you enjoyed this content like and share this video and subscribe to my Youtube channel!
Encryption is the best tool in this fight for your right to privacy. Now more than anytime in history privacy is of the essence. In today’s tutorial I will show you how to create a simple messenger service in Laravel and Vue.js; however they will be password protected and encrypted therefore the receiver must know the password beforehand to read the message. All code can be found on my Github repo.
Setting Up The Backend
The application itself has only one model and that is the Message model. It has 3 properties: content, email and passphrase. The content stores the encrypted message. The email is the email address of who is receiving the message. Finally the passphrase is the password that protects the message from being opened by anybody.
php artisan make:model -m Message
Open the Message.php file and make it Notifiable and change the $fillable
<?php
namespace App;
use Illuminate\Notifications\Notifiable;
use Illuminate\Database\Eloquent\Model;
class Message extends Model
{
use Notifiable;
//
public $fillable = ['content','passphrase','email'];
}
Next open up the migration file that was created with the model and add the following:
<?php
use Illuminate\Support\Facades\Schema;
use Illuminate\Database\Schema\Blueprint;
use Illuminate\Database\Migrations\Migration;
class CreateMessagesTable extends Migration
{
/**
* Run the migrations.
*
* @return void
*/
public function up()
{
Schema::create('messages', function (Blueprint $table) {
$table->increments('id');
$table->longText('content');
$table->string('passphrase');
$table->string('email');
$table->timestamps();
});
}
/**
* Reverse the migrations.
*
* @return void
*/
public function down()
{
Schema::dropIfExists('messages');
}
}
Next create the controller. This controller will be RESTful with an extra method for decrypting the messages.
Open the file and fill in the methods store(), show() and decrypt()
<?php
namespace App\Http\Controllers;
use Illuminate\Http\Request;
use App\Message;
use App\Notifications\MessageCreated;
use Illuminate\Contracts\Encryption\DecryptException;
class MessageController extends Controller
{
/**
* Display a listing of the resource.
*
* @return \Illuminate\Http\Response
*/
public function index()
{
//
}
/**
* Show the form for creating a new resource.
*
* @return \Illuminate\Http\Response
*/
public function create()
{
//
}
/**
* Store a newly created resource in storage.
*
* @param \Illuminate\Http\Request $request
* @return \Illuminate\Http\Response
*/
public function store(Request $request)
{
//
$message = Message::Create([
'content' => encrypt($request->content),
'passphrase' => encrypt($request->password),
'email' => $request->email
]);
$message->notify(new MessageCreated($message));
return response()->json($message);
}
/**
* Display the specified resource.
*
* @param int $id
* @return \Illuminate\Http\Response
*/
public function show($id)
{
//
$message = Message::findOrFail($id);
return view('message')->with([
'message' => $message
]);
}
public function decrypt(Request $request, $id){
try{
$message = Message::findOrFail($id);
if($request->password == decrypt($message->passphrase)){
$message = decrypt($message->content);
$with = [
'message' => $message
];
return response()->json($with);
}
}
catch (DecryptException $e){
return response()->json($e);
}
}
/**
* Show the form for editing the specified resource.
*
* @param int $id
* @return \Illuminate\Http\Response
*/
public function edit($id)
{
//
}
/**
* Update the specified resource in storage.
*
* @param \Illuminate\Http\Request $request
* @param int $id
* @return \Illuminate\Http\Response
*/
public function update(Request $request, $id)
{
//
}
/**
* Remove the specified resource from storage.
*
* @param int $id
* @return \Illuminate\Http\Response
*/
public function destroy($id)
{
//
}
}
As you can see there is a call to a notification that has not been created yet so create it
php artisan make:notification MessageCreated
Open that up and replace it with the following which will call the toMail method and alert the recipient they have a new message to view
<?php
namespace App\Notifications;
use Illuminate\Bus\Queueable;
use Illuminate\Notifications\Notification;
use Illuminate\Contracts\Queue\ShouldQueue;
use Illuminate\Notifications\Messages\MailMessage;
class MessageCreated extends Notification
{
use Queueable;
public $message;
/**
* Create a new notification instance.
*
* @return void
*/
public function __construct(\App\Message $message)
{
//
$this->message = $message;
}
/**
* Get the notification's delivery channels.
*
* @param mixed $notifiable
* @return array
*/
public function via($notifiable)
{
return ['mail'];
}
/**
* Get the mail representation of the notification.
*
* @param mixed $notifiable
* @return \Illuminate\Notifications\Messages\MailMessage
*/
public function toMail($notifiable)
{
return (new MailMessage)
->line('You have a new encrypted message.')
->line('You should have been given the passphrase')
->action('Decrypt and Read Now!', url('/message/'.$this->message->id))
->line('Thank you for using our application!');
}
/**
* Get the array representation of the notification.
*
* @param mixed $notifiable
* @return array
*/
public function toArray($notifiable)
{
return [
//
];
}
}
Lastly the api and web routes need to be updated
In web.php
<?php
/*
|--------------------------------------------------------------------------
| Web Routes
|--------------------------------------------------------------------------
|
| Here is where you can register web routes for your application. These
| routes are loaded by the RouteServiceProvider within a group which
| contains the "web" middleware group. Now create something great!
|
*/
Route::get('/', function () {
return view('home');
});
Route::get('/home', 'HomeController@index')->name('home');
Route::get('/message/{id}','MessageController@show');
In api.php
<?php
use Illuminate\Http\Request;
/* |-------------------------------------------------------------------------- | API Routes Fr */
Route::middleware('auth:api')->get('/user', function (Request $request) { return $request->user(); });
Route::resource('/message','MessageController');
Route::post('/decrypt-message/{id}','MessageController@decrypt');
Lastly let’s create the view files. As a shortcut I scaffold authentication even though we aren’t using it to get the bootstrap layouts and the home.blade.php file. Copy the home.blade.php file to another file called message.blade.php.
In home.blade.php
The Vue.js side of things is pretty simple there are two components a MessageSend and a MessageRead. Create a file in your resources/assets/js/components folder called MessageSend.vue and MessageRead.vue.
In your resources/assets/js/app.js file don’t forget to add your components
/**
* First we will load all of this project's JavaScript dependencies which
* includes Vue and other libraries. It is a great starting point when
* building robust, powerful web applications using Vue and Laravel.
*/
require('./bootstrap');
window.Vue = require('vue');
/**
* Next, we will create a fresh Vue application instance and attach it to
* the page. Then, you may begin adding components to this application
* or customize the JavaScript scaffolding to fit your unique needs.
*/
Vue.component('send-message', require('./components/MessageSend.vue'));
Vue.component('read-message', require('./components/MessageRead.vue'));
const app = new Vue({
el: '#app'
});
In this segment we explore the stripe product and sku apis. This allows us to do inventory management inside of our app. For the full source code go here.
Xiaolang Zhang Was Trying To Get A Job At Xiaopeng Motors
Xiaopeng Motors G3 Model
What better way to get a job at a hot Chinese tech autonomous vehicle start up than by stealing/giving 40GBs worth of proprietary data from Apple’s autonomous car division to said company? Well that is exactly what Xiaolang Zhang did and he likely will do 10 years federal time for it. According to an article from The Verge Xiaolang Zhang worked for Apple from December 2015 until May 2018 and has been arrested over the past weekend trying to flee the country. In April of this year Xiaolang Zhang returned back to Apple from a month long paternity leave to inform Apple that he was quitting and moving back to China to take care of his ailing and sick mother. Afterwards he told his supervisors that he planned on working for Alibaba-backed start up Xiaopeng Motors.
Apple Thought The Timing Was Supicious
Apple Headquarters
The timing and revelation that Xiaolang Zhang was leaving to go to Xiaopeng Motors made Apple suspicious and rightfully so. They audited his work computer and work devices and discovered that his network activity had spiked exponentially in the time leading up to his quitting. When looking further it was discovered that 40GBs worth of data had been copied onto his local device and air dropped to his wife (of which 60% was deemed critical and concerning). CCTV footage also showed Xiaolang Zhang stealing cables and computers from the Apple campus. Apple alerted the FBI who then got a search warrant for Xiaolang Zhang’s home. They raided his home on June 27th, 2018 and Zhang told them what he had told Apple. He was arresting after the FBI learned he bought a round trip ticket from San Jose, California to Beijing, China. He was arrested at the security checkpoint.
Who Is Xiaopeng Motors
Guangzhou Xiaopeng Motors Technology, or known simply as Xpeng, was founded in 2014 by mobile internet entrepreneur He Xiaopeng. This company is backed by Alibaba (think of them like the Amazon of China). Both are seen as major competitors to Apple, Google and other tech companies in the autonomous vehicle sector. For a more detailed breakdown of this incident watch my #TechTalk on it below and don’t forget to like this video, leave comments and subscribe! Enjoy this #TechTalk support the site by visiting the shop.
In part 4 we add recurring billing to our point of sales system by utilizing Stipe Subscriptions. Subscriptions in conjunction with our customers created in part 3 allows for easy tracking of expenses and opens the way for residual income. Next up we add inventory management to the system! For the source code click here and don’t forget to subscribe to the YouTube channel!
In the previous segment we set up the Stripe webhooks so that Stripe can interact with our system asynchronously. Today we implement Stripe customers in our platform. For all source code check here. In the next post we introduce recurring billing.
In this second part of the tutorial (here is part one) I show you how to work with Stripe webhooks, create a manifest.json file and implement push notifications. The full source code is listed below here. An important part of any point of sales system, is alerting you when you have successful transactions among other things. Stripe has a wonderful webhook system that allows us to interact with the system with events. A full list of events can be found here if you want to expand the source code. In part 3 I will show you how to add customers to your POS platform and what can be done by doing so. Don’t forget to like the video and subscribe to my Youtube channel!
Creating web apps for the fun of it is cool, but we all need to get paid right?! This new series explores how to create a point of sales system with Laravel, Vue.js and the Stripe API. A point of sales system (or POS) is software solution that allows you to process money. In this case we will use Stripe to process credit/debit cards as well as manage inventory. Using a fullstack Laravel and Vue.js application we can collect money, send invoices and get paid all in one location. By the time this series is over you will have used:
Laravel Passport
Laravel Socialite
Stripe Charge API
Stripe Product API
Stripe Subscription API
All of the source code is available at https://github.com/mastashake08/laravel-vue-pos. In part one I explain what it is we are building today as well as setting up the ground work for the future. Watch the video below and don’t forget to subscribe to the channel and share the video! Lastly don’t forget to check out the live version right here! Now on to part 2.
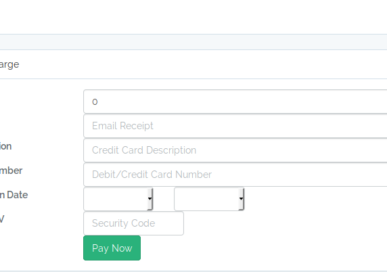
In part one we created a point of sales system using Laravel and Vue (if you haven’t done part 1 here is the source code). It had very basic functionality but it got the job done, you could charge debit/credit cards. The basic design looked like this
In part two we will add email invoice functionality so that we can email our customers and they can pay without us having to know their account information. For this we will be using Laravel’s notification framework on the backend and utilizing the web payment request API with Vue.js on the front end.
The Invoice Model
In the command line we will create a new model to represent our invoices type in the following command to generate your model and migration
php artisan make:model -m Invoice
Once the model and migration are made, open up migration and edit accordingly:
<?php
use Illuminate\Support\Facades\Schema;
use Illuminate\Database\Schema\Blueprint;
use Illuminate\Database\Migrations\Migration;
class CreateInvoicesTable extends Migration
{
    /**
     * Run the migrations.
     *
     * @return void
     */
    public function up()
    {
        Schema::create('invoices', function (Blueprint $table) {
            $table->increments('id');
            $table->string('name');
            $table->longText('description');
            $table->integer('amount');
            $table->string('email');
            $table->string('charge_id');
            $table->boolean('is_paid')->default(false);
            $table->timestamps();
        });
    }
    /**
     * Reverse the migrations.
     *
     * @return void
     */
    public function down()
    {
        Schema::dropIfExists('invoices');
    }
}
As you can see there are only a few fields
name of person being invoiced
description of the invoice
amount to be invoiced
email address for invoice to be mailed to
stripe charge id
boolean indicating whether or not the invoice has been paid
Open up the Invoice.php model and add the following to the $fillable array
<?php
namespace App;
use Illuminate\Database\Eloquent\Model;
use Illuminate\Notifications\Notifiable;
class Invoice extends Model
{
    use Notifiable;
    //
    protected $fillable = ['name','amount','email','description','charge_id'];
}
Next we need to create some api routes and a RESTful controller. Let’s start with the routes, open up routes/api.php and add the following routes
Open up the controller and replace with the following
<?php
namespace App\Http\Controllers;
use Illuminate\Http\Request;
use App\Invoice;
class InvoiceController extends Controller
{
  public function __construct(){
    \Stripe\Stripe::setApiKey(env('STRIPE_SECRET'));
  }
    /**
     * Display a listing of the resource.
     *
     * @return \Illuminate\Http\Response
     */
    public function index()
    {
        //
        $invoices = Invoice::where('is_paid',true)->get();
        return response()->json([
          'invoices' => $invoices
        ]);
    }
    /**
     * Show the form for creating a new resource.
     *
     * @return \Illuminate\Http\Response
     */
    public function create()
    {
        //
    }
    /**
     * Store a newly created resource in storage.
     *
     * @param  \Illuminate\Http\Request  $request
     * @return \Illuminate\Http\Response
     */
    public function store(Request $request)
    {
        //
        $invoice = Invoice::Create($request->all());
        $invoice->notify(new \App\Notifications\InvoiceCreated());
        return response()->json([
          'invoice' => $invoice
        ]);
    }
    /**
     * Display the specified resource.
     *
     * @param  int  $id
     * @return \Illuminate\Http\Response
     */
    public function show($id)
    {
        //
    }
    /**
     * Show the form for editing the specified resource.
     *
     * @param  int  $id
     * @return \Illuminate\Http\Response
     */
    public function edit($id)
    {
        //
    }
    /**
     * Update the specified resource in storage.
     *
     * @param  \Illuminate\Http\Request  $request
     * @param  int  $id
     * @return \Illuminate\Http\Response
     */
    public function update(Request $request, $id)
    {
        //
        $invoice = Invoice::findOrFail($id);
        $invoice->fill($request->all())->save();
        return response()->json([
          'invoice' => $invoice
        ]);
    }
    /**
     * Remove the specified resource from storage.
     *
     * @param  int  $id
     * @return \Illuminate\Http\Response
     */
    public function destroy($id)
    {
        //
        return response()->json([
          'success' => Invoice::findOrFail($id)->delete()
        ]);
    }
    function getPayInvoice($id){
      return view('invoice')->with([
        'invoice' => Invoice::findOrFail($id)
      ]);
    }
    function payInvoice(Request $request,$id){
      $invoice = Invoice::findOrFail($id);
      try {
        // Use Stripe's library to make requests...
        $token = \Stripe\Token::create(array(
          "card" => array(
            "number" => $request->details['cardNumber'],
            "exp_month" => $request->details['expiryMonth'],
            "exp_year" => $request->details['expiryYear'],
            "cvc" => $request->details['cardSecurityCode']
          )
        ));
        \Stripe\Charge::create(array(
          "amount" => $invoice->amount,
          "currency" => "usd",
          "source" => $token, // obtained with Stripe.js
          "description" => $invoice->description,
          "receipt_email" => $invoice->email
        ));
        return response()->json([
          'success' => true
        ]);
      } catch(\Stripe\Error\Card $e) {
        // Since it's a decline, \Stripe\Error\Card will be caught
        return response()->json($e->getJsonBody());
      } catch (\Stripe\Error\RateLimit $e) {
        // Too many requests made to the API too quickly
        return response()->json($e->getJsonBody());
      } catch (\Stripe\Error\InvalidRequest $e) {
        // Invalid parameters were supplied to Stripe's API
        return response()->json($e->getJsonBody());
      } catch (\Stripe\Error\Authentication $e) {
        // Authentication with Stripe's API failed
        // (maybe you changed API keys recently)
        return response()->json($e->getJsonBody());
      } catch (\Stripe\Error\ApiConnection $e) {
        // Network communication with Stripe failed
        return response()->json($e->getJsonBody());
      } catch (\Stripe\Error\Base $e) {
        // Display a very generic error to the user, and maybe send
        // yourself an email
        return response()->json($e->getJsonBody());
      } catch (Exception $e) {
        // Something else happened, completely unrelated to Stripe
        return response()->json($e->getJsonBody());
      }
    }
}
Most of the CRUD operations are simple, in the create method we are calling a notification on the invoice (we will create the notification next don’t worry), and we have the charge method which is really just copy and paste from the other charge method except the amount comes from the invoice.
The last thing needed on the back end is the notification. Let’s go ahead and create that.
php artisan make:notification InvoiceCreated
In the notification file we just send an email with a link to pay
<?php
namespace App\Notifications;
use Illuminate\Bus\Queueable;
use Illuminate\Notifications\Notification;
use Illuminate\Contracts\Queue\ShouldQueue;
use Illuminate\Notifications\Messages\MailMessage;
class InvoiceCreated extends Notification
{
    use Queueable;
    /**
     * Create a new notification instance.
     *
     * @return void
     */
    public function __construct()
    {
        //
    }
    /**
     * Get the notification's delivery channels.
     *
     * @param  mixed  $notifiable
     * @return array
     */
    public function via($notifiable)
    {
        return ['mail'];
    }
    /**
     * Get the mail representation of the notification.
     *
     * @param  mixed  $notifiable
     * @return \Illuminate\Notifications\Messages\MailMessage
     */
    public function toMail($notifiable)
    {
        return (new MailMessage)
                    ->subject('You Have A New Invoice Due')
                    ->line('Pay NOW or suffer the consequences!')
                    ->action('Pay UP!', url('/invoice/pay/'.$notifiable->id))
                    ->line('Thank you for using our application!');
    }
    /**
     * Get the array representation of the notification.
     *
     * @param  mixed  $notifiable
     * @return array
     */
    public function toArray($notifiable)
    {
        return [
            //
        ];
    }
}
The Front End
We are going to create 2 components and a new page so people can pay their invoice. Create a new component in your vue application name it InvoiceComponent and replace with the following
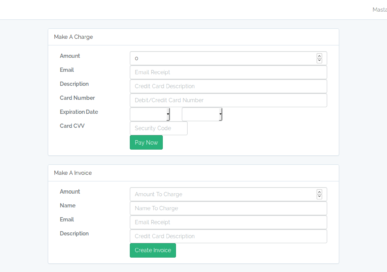
Drop that new component in your home.blade file and your page should look like this
Create another component call it InvoicePayController and place the following
We are making use of the Payment Request API to gather all user card data to simplify the checkout process, you can read up more about it here. Create a new blade view file and call it Invoice.blade.php and put this new component there
Now your customers can pay invoices sent to them via email! Please don’t forget to subscribe to my Youtube Channel and like the video and post! Also don’t forget if you want to support this blog pre-orders for my new e-book are open now until the end of month!
Using this Web Speech JavaScript API you can enable your web apps to handle voice data. The API is broken down into two parts SpeechSynthesis and SpeechRecognition. SpeechSynthesis also known as text-to-speech allows your web app to read text aloud from your speakers. SpeechRecognition allows your web app to convert voice data from your microphone into text.
What Are We Building?
To adequately demonstrate the power of the web speech API I decided to break the project up into steps. Step one is a simple voice dictated note taking app. The premise is very simple, you create an account and on the dashboard you have a list of your notes as well as a button to add a new note. Once that button is pressed you are prompted to allow access to your microphone. The SpeechRecognition API will transcribe your speech and when complete saves it to the database. In case you missed the livestream here is a link to the source code as well as a link to the live app.
What Are The Next Steps?
As you can see there isn’t much coding or difficulty setting up the API. Bear in mind I barely scratched the surface of what SpeechRecognition can do (for a more detail examination I suggest reading here). In my next livestream I will expand on this app and add SpeechSynthesis functionality into the program. You will be able to pick different voices, adjust the pitch and rate of speech and allow the browser to read your notes back to you! I hope to see you all on the next stream, if you haven’t already subscribe to my channel and to this blog. If you have any questions or concerns please drop them in the comment section below until next time happy hacking!