Posted on 1 Comment

Creating A Voice Powered Note App Using Web Speech

Web Speech API Is A Powerful Feature!

Using this Web Speech JavaScript API you can enable your web apps to handle voice data. The API is broken down into two parts SpeechSynthesis and SpeechRecognition. SpeechSynthesis also known as text-to-speech allows your web app to read text aloud from your speakers. SpeechRecognition allows your web app to convert voice data from your microphone into text.
 

What Are We Building?


speech-notes-screenshot
To adequately demonstrate the power of the web speech API I decided to break the project up into steps. Step one is a simple voice dictated note taking app. The premise is very simple, you create an account and on the dashboard you have a list of your notes as well as a button to add a new note. Once that button is pressed you are prompted to allow access to your microphone. The SpeechRecognition API will transcribe your speech and when complete saves it to the database. In case you missed the livestream here is a link to the source code as well as a link to the live app.
 

What Are The Next Steps?

As you can see there isn’t much coding or difficulty setting up the API. Bear in mind I barely scratched the surface of what SpeechRecognition can do (for a more detail examination I suggest reading here). In my next livestream I will expand on this app and add SpeechSynthesis functionality into the program. You will be able to pick different voices, adjust the pitch and rate of speech and  allow the browser to read your notes back to you! I hope to see you all on the next stream, if you haven’t already subscribe to my channel and to this blog. If you have any questions or concerns please drop them in the comment section below until next time happy hacking!

Posted on 3 Comments

Create A Point Of Sales System With Vue/Laravel + Stripe

Point Of Sales In The Palm Of Your Hand

In today’s tutorial I will be creating a point of sales system utilizing Vue and Laravel with Stripe being our payment processor. The program will allow a stripe account holder to take payments and if on mobile will allow them to scan the card via the device’s camera. It will utilize Laravel Passport for secure API calls and Stripe to handle the payments.

Installing The Dependencies

The app uses two dependencies as of now and those are Stipe and Laravel Passport install them using composer
 

composer require laravel/passportstripe/stripe-php

Now run the migrations (I’m using Laravel 5.5 so the packages are auto-discovered)

php artisan migrate

Now open your app/User.php model and edit the following

<?php
namespace App;
use Laravel\Passport\HasApiTokens;
use Illuminate\Notifications\Notifiable;
use Illuminate\Foundation\Auth\User as Authenticatable;
class User extends Authenticatable
{
    use HasApiTokens, Notifiable;
}

Next register the Passport routes in your AuthServiceProvider

<?php
namespace App\Providers;
use Laravel\Passport\Passport;
use Illuminate\Support\Facades\Gate;
use Illuminate\Foundation\Support\Providers\AuthServiceProvider as ServiceProvider;
class AuthServiceProvider extends ServiceProvider
{
    /**
     * The policy mappings for the application.
     *
     * @var array
     */
    protected $policies = [
        'App\Model' => 'App\Policies\ModelPolicy',
    ];
    /**
     * Register any authentication / authorization services.
     *
     * @return void
     */
    public function boot()
    {
        $this->registerPolicies();
        Passport::routes();
    }
}

Register the api driver in config/auth.php

'guards' => [
    'web' => [
        'driver' => 'session',
        'provider' => 'users',
    ],
    'api' => [
        'driver' => 'passport',
        'provider' => 'users',
    ],
],

Lastly set the web middleware group

'web' => [
    // Other middleware...
    \Laravel\Passport\Http\Middleware\CreateFreshApiToken::class,
],

Controller

This application only needs one external controller

php artisan make:controller StripeController

This controller will only contain 2 methods __construct() and charge(). The __construct method will set the StripeApiKey and the charge method actually makes the charge

<?php
namespace App\Http\Controllers;
use Illuminate\Http\Request;
class StripeController extends Controller
{
 //
 public function __construct(){
 \Stripe\Stripe::setApiKey(env('STRIPE_SECRET'));
 }
public function charge(Request $request){
 try {
 // Use Stripe's library to make requests...
 $token = \Stripe\Token::create(array(
 "card" => array(
 "number" => $request->card['card_number'],
 "exp_month" => $request->card['expiry_month'],
 "exp_year" => $request->card['expiry_year'],
 "cvc" => $request->card['cvv']
 )
 ));
 \Stripe\Charge::create(array(
 "amount" => $request->amount * 100,
 "currency" => "usd",
 "source" => $token, // obtained with Stripe.js
 "description" => $request->description,
 "receipt_email" => $request->email
 ));
 return response()->json([
 'success' => true
 ]);
 } catch(\Stripe\Error\Card $e) {
 // Since it's a decline, \Stripe\Error\Card will be caught
 return response()->json($e->getJsonBody());
 } catch (\Stripe\Error\RateLimit $e) {
 // Too many requests made to the API too quickly
 return response()->json($e->getJsonBody());
 } catch (\Stripe\Error\InvalidRequest $e) {
 // Invalid parameters were supplied to Stripe's API
 return response()->json($e->getJsonBody());
 } catch (\Stripe\Error\Authentication $e) {
 // Authentication with Stripe's API failed
 // (maybe you changed API keys recently)
 return response()->json($e->getJsonBody());
 } catch (\Stripe\Error\ApiConnection $e) {
 // Network communication with Stripe failed
 return response()->json($e->getJsonBody());
 } catch (\Stripe\Error\Base $e) {
 // Display a very generic error to the user, and maybe send
 // yourself an email
 return response()->json($e->getJsonBody());
 } catch (Exception $e) {
 // Something else happened, completely unrelated to Stripe
 return response()->json($e->getJsonBody());
 }
 }
}

The controller is now finished let’s create the API routes

API Routes

Open the routes/api.php file and add the following routes

<?php
use Illuminate\Http\Request;
/*
|--------------------------------------------------------------------------
| API Routes
|--------------------------------------------------------------------------
|
| Here is where you can register API routes for your application. These
| routes are loaded by the RouteServiceProvider within a group which
| is assigned the "api" middleware group. Enjoy building your API!
|
*/
Route::middleware('auth:api')->get('/user', function (Request $request) {
 return $request->user();
});
Route::middleware('auth:api')->post('/charge','StripeController@charge');

The backend is now complete now for the front end.

Vue Component

Get rid of the example component and create a new one called ChargeComponent and add the following content

<template>
 <div class="container">
 <div class="row">
 <div class="col-md-8 col-md-offset-2">
 <div class="panel panel-default">
 <div class="panel-heading">Make A Charge</div>
<div class="panel-body">
 <fieldset>
 <div class="form-group">
 <label class="col-sm-3 control-label" for="amount">Amount</label>
 <div class="col-sm-9">
 <input type="number" class="form-control" id="amount" placeholder="Amount To Charge" v-model="amount">
 </div>
 </div>
 <div class="form-group">
 <label class="col-sm-3 control-label" for="email">Email</label>
 <div class="col-sm-9">
 <input type="email" class="form-control" id="email" placeholder="Email Receipt" v-model="email">
 </div>
 </div>
 <div class="form-group">
 <label class="col-sm-3 control-label" for="description">Description</label>
 <div class="col-sm-9">
 <input type="text" class="form-control" id="description" placeholder="Credit Card Description" v-model="description">
 </div>
 </div>
 <div class="form-group">
 <label class="col-sm-3 control-label" for="card-number">Card Number</label>
 <div class="col-sm-9">
 <input type="text" class="form-control" name="card-number" id="card-number" placeholder="Debit/Credit Card Number" autocomplete="cc-number" v-model="card.card_number">
 </div>
 </div>
 <div class="form-group">
 <label class="col-sm-3 control-label" for="expiry-month">Expiration Date</label>
 <div class="col-sm-9">
 <div class="row">
 <div class="col-xs-3">
 <select class="form-control col-sm-2" name="expiry-month" id="expiry-month" autocomplete="cc-exp-month" v-model="card.expiry_month">
 <option>Month</option>
 <option value="01">Jan (01)</option>
 <option value="02">Feb (02)</option>
 <option value="03">Mar (03)</option>
 <option value="04">Apr (04)</option>
 <option value="05">May (05)</option>
 <option value="06">June (06)</option>
 <option value="07">July (07)</option>
 <option value="08">Aug (08)</option>
 <option value="09">Sep (09)</option>
 <option value="10">Oct (10)</option>
 <option value="11">Nov (11)</option>
 <option value="12">Dec (12)</option>
 </select>
 </div>
 <div class="col-xs-3">
 <select class="form-control" name="expiry-year" autocomplete="cc-exp-year" v-model="card.expiry_year">
 <option value="17">2017</option>
 <option value="18">2018</option>
 <option value="19">2019</option>
 <option value="20">2020</option>
 <option value="21">2021</option>
 <option value="22">2022</option>
 <option value="23">2023</option>
 </select>
 </div>
 </div>
 </div>
 </div>
 <div class="form-group">
 <label class="col-sm-3 control-label" for="cvv">Card CVV</label>
 <div class="col-sm-3">
 <input type="text" class="form-control" name="cvv" id="cvv" placeholder="Security Code" autocomplete="cvc" v-model="card.cvv">
 </div>
 </div>
 <div class="form-group">
 <div class="col-sm-offset-3 col-sm-9">
 <button type="button" class="btn btn-success" v-on:click="createCharge">Pay Now</button>
 </div>
 </div>
 </fieldset>
 </div>
 </div>
 </div>
 </div>
 </div>
</template>
<script>
 export default {
 mounted() {
 console.log('Component mounted.')
 },
 data(){
 return{
 card: {
 card_number: null,
 expiry_year: null,
 expiry_month: null,
 cvv: null
 },
 amount: 0,
 email: null,
 description: null
 }
 },
 methods: {
 createCharge: function(){
 axios.post('/api/charge',{card: this.card, amount: this.amount, description: this.description})
 .then(function(data){
 alert('Success!')
 }).catch(function(error){
 alert(error.message);
 });
 }
 }
 }
</script>

Edit the app.js file to match the following

/**
 * First we will load all of this project's JavaScript dependencies which
 * includes Vue and other libraries. It is a great starting point when
 * building robust, powerful web applications using Vue and Laravel.
 */
require('./bootstrap');
window.Vue = require('vue');
/**
 * Next, we will create a fresh Vue application instance and attach it to
 * the page. Then, you may begin adding components to this application
 * or customize the JavaScript scaffolding to fit your unique needs.
 */
Vue.component('charge-component', require('./components/ChargeComponent.vue'));
const app = new Vue({
 el: '#app'
 });

now install the npm dependencies and run mix

npm install && npm run dev

Enjoy your new app! You can fork the source code here! Be sure to like/subscribe/share and if you want to show your support please check out the shop!

Posted on 1 Comment

Setting Your Twitter Account To Auto Like Posts Of Interest

Auto Likes

Are a great way to interact with accounts who might be potential followers and is a great way for your to explore your potential audience. I will show you how to take the existing twitter microservice we have and extend it to stream a filter of tweets that track keywords, then like that tweet. If you have no idea what I am talking about then perhaps you should start here when we began this project.
 

Extending twitter.js

Open up the node script we created in the last tutorial, twitter.js and inside we are going to add the code needed to track tweets that meet a certain filter requirement. However it is important that we stream it so we get fresh content coming in.

var filter = T.stream('statuses/filter',{track: ['#30days30sites','#100DaysOfCode','#301DaysOfCode','#Webapp','#laravel','#vuejs']});
filter.on('tweet',function(tweet){
 T.post('favorites/create', { id: tweet.id_str },function(data){
 console.log(data);
 });
});

In the example above I am tracking all tweets in real-time that contain #30days30sites, #100DaysOfCode, #301DaysOfCode, #Webapp, #laravel and #vuejs. Then whenever the ‘tweet’ event fires I create a favorite (same thing as a like) and grabs the tweet id. Of course in your example you are going to want to change what you track. These 6 lines of code do wonders for me, there is something special about random people liking your tweets, also many people come and visit my profile after seeing I liked something on theirs. SInce launching this app I have definitely noticed an uptick in the amount of accounts that follow me.
In the future I plan on extending this to incorporate AI algorithms to parse what exactly was said and retweet or respond depending on the context or the tweet. Perhaps when I have the time I will do a livestream of the event. If there is anything you would like to see me do leave it in a comment below.

Posted on 2 Comments

Automating Your DMs With Nodejs

In The Last Tutorial

We created a Laravel/Vue app that allows us to automate and schedule our Twitter posts. Now we are going to add a Node.js microservice that will send an auto DM to those who follow you on Twitter. This adds a personal touch when you gain new followers and makes people more apt to pay attention to your tweets. If you don’t have the app from the last tutorial, you can download it here. Otherwise open up your terminal to the project root and let’s get started.
 

Node Script

This node script will use the twit npm module to create a Twitter stream listening to our own account. When the follow event is fired we will grab the source id of the user that sent us a follow request, after which we will send a DM to that user id with a welcome message. Let’s start by adding the twit dependency and the dotenv dependency.

npm install twit dotenv --save

Now create a new file called twitter.js and fill with the following:

require('dotenv').config()
var Twit = require('twit')
var T = new Twit({
 consumer_key: process.env.TWITTER_CONSUMER_KEY,
 consumer_secret: process.env.TWITTER_CONSUMER_SECRET,
 access_token: process.env.TWITTER_ACCESS_TOKEN,
 access_token_secret: process.env.TWITTER_ACCESS_TOKEN_SECRET,
 timeout_ms: 60*1000, // optional HTTP request timeout to apply to all requests.
})var stream = T.stream('user');
stream.on('connected', function(response){
 console.log('Connected!')
});
stream.on('follow',function(data){
 console.log(data.source.id);
 T.post('direct_messages/events/new',{
 "event": {
 "type": "message_create",
 "message_create": {
 "target": {
 "recipient_id": data.source.id
 },
 "message_data": {
 "text": "Thanks for the follow! Be sure to check out my blog https://jyroneparker.com",
 }
 }
 }
})});

The dotenv dependency allows us to use the same .env file to grab our Twitter app credentials that we used in our Laravel app. As you can see the stream fires on different events we just choose the follow and the connected events. Lastly we need to run the script make sure you have supervisor or some other program running it as a daemon.

node twitter.js

If you want to extend the functionality read up on the Twitter stream documentation here. Otherwise add some auto like functionality to your bot.

Posted on 7 Comments

How To Automate Your Twitter Posts With Laravel and Vue

Twitter Marketing Is Huge

Well for my platform it is anyway, whenever I create a new app or website Twitter is the first social network that I turn to. It’s fast, the analytics are on point, and it’s easy to use, my only issue is that I am busy coding and whatnot to Tweet as much as I would like or need to in order to optimize my reach. This leaves me with two options:

  1. Pay someone to manage my account for me
  2. Learn the Twitter API and write my own automation program to manage it myself

The idea of paying another person to manage my social media just made my stomach and my wallet hurt so the OBVIOUS choice is to use the API. Now let me tell you thisn  API is DENSE there is a lot you can do with it (click here for the docs) so I will only focus on one aspect in this tutorial, sending posts. The first basic application that I wrote was a simple post scheduler, it allows me to create as many posts as I want, set a date-time to post at, then a Laravel job executes at the desired time, then deletes the entry from the database. This basic application has saved me tremendous time because now I can just schedule all my important tweets weeks or months early!
 

Registering Your Twitter App

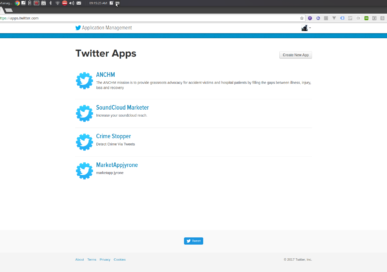
Before you can do any actual coding you need to register your app on Twitter, head over to the developer portal and create your app. The home page will show a list of your Twitter apps, if this is your first time then you won’t have any apps, click on create new app.
Fill out all the mandatory fields then proceed you should see a screen that shows you your Consume Key and Consumer Secret. Copy those down and also create some access tokens. These access tokens are for writing Twitter apps that only interact with your OWN account. Copy down the access token and the access token secret and that’s all you have to do. Now let’s code!
 

App Components


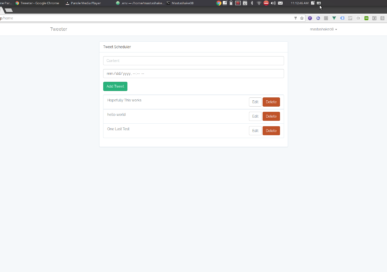
The main page will be a Vue.js app that allows you to add new tweets, and an area below to edit and delete them. In a traditional SPA manner the app will interact with an API for all it’s calls. The backend will consist of one model (Tweet), one controller (TweetController), and one Job ProcessTweet, pretty simple stuff let’s begin.  Start by creating your Laravel application.

laravel new tweeter && cd tweeter && php artisan make:auth

This app only has one composer dependency add it

composer require thujohn/twitter

In the config/app.php make sure to add the following provider and alias

'providers' => [
    Thujohn\Twitter\TwitterServiceProvider::class,
]
'aliases' => [
    'Twitter' => Thujohn\Twitter\Facades\Twitter::class,
]

Lastly run the following command to import the twitter config/ttwitter.php file and modify inserting your Twitter app credentials

php artisan vendor:publish --provider="Thujohn\Twitter\TwitterServiceProvider"

Tweet Model

Now create the Tweet model along with it’s migration

php artisan make:model -m Tweet

The Tweet model only has two attributes a string that holds the content that is limited to 140 characters and a timestamp for when you want the tweet to be published.

<?php
use Illuminate\Support\Facades\Schema;
use Illuminate\Database\Schema\Blueprint;
use Illuminate\Database\Migrations\Migration;
class CreateTweetsTable extends Migration
{
 /**
 * Run the migrations.
 *
 * @return void
 */
 public function up()
 {
 Schema::create('tweets', function (Blueprint $table) {
 $table->increments('id');
 $table->string('content',140);
 $table->timestamp('publish_timestamp');
 $table->timestamps();
 });
 }/**
 * Reverse the migrations.
 *
 * @return void
 */
 public function down()
 {
 Schema::dropIfExists('tweets');
 }
}

The Tweet model is pretty bare bones

<?php
namespace App;
use Illuminate\Database\Eloquent\Model;
class Tweet extends Model
{
 //
 public $fillable = [
 'content',
 'publish_timestamp'
 ];
}

Go ahead and run your migrations we are done with models, now to make our RESTful controller.

RESTful Controller and Routes

Create a resource controller for our Tweet model

php artisan make:controller --resource TweetController

The controller is basic I purposely left out validation and such as a homework exercise for you, but the gist is basic CRUD operations that return JSON

<?php
namespace App\Http\Controllers;
use Illuminate\Http\Request;
use App\Tweet;
use App\Jobs\ProcessTweet;
class TweetController extends Controller
{
 /**
 * Display a listing of the resource.
 *
 * @return \Illuminate\Http\Response
 */
 public function index()
 {
 //
 return response()->json(Tweet::all());
 }
/**
 * Show the form for creating a new resource.
 *
 * @return \Illuminate\Http\Response
 */
 public function create()
 {
 //
 }
/**
 * Store a newly created resource in storage.
 *
 * @param \Illuminate\Http\Request $request
 * @return \Illuminate\Http\Response
 */
 public function store(Request $request)
 {
 //create the tweet
 $tweet = Tweet::Create([
 'content' => $request->content,
 'publish_timestamp' => \Carbon\Carbon::parse($request->publish_timestamp)
 ]);
 //Add tweet to the queue
 ProcessTweet::dispatch($tweet)->delay(\Carbon\Carbon::parse($request->publish_timestamp,'America/New_York')->diffInSeconds(\Carbon\Carbon::now('America/New_York')));
//return json
 return response()->json($tweet);
 }/**
 * Display the specified resource.
 *
 * @param int $id
 * @return \Illuminate\Http\Response
 */
 public function show($id)
 {
 //
 return response()->json(Tweet::findOrFail($id));
 }/**
 * Show the form for editing the specified resource.
 *
 * @param int $id
 * @return \Illuminate\Http\Response
 */
 public function edit($id)
 {
 //
 }/**
 * Update the specified resource in storage.
 *
 * @param \Illuminate\Http\Request $request
 * @param int $id
 * @return \Illuminate\Http\Response
 */
 public function update(Request $request, $id)
 {
 //
 $tweet = Tweet::findOrFail($id);
 $tweet->fill([
 'content' => $request->content,
 'publish_timestamp' => \Carbon\Carbon::parse($request->publish_timestamp)
 ]);
 //return json
 return response()->json($tweet);
 }
/**
 * Remove the specified resource from storage.
 *
 * @param int $id
 * @return \Illuminate\Http\Response
 */
 public function destroy($id)
 {
 //
 Tweet::destroy($id);
 }
}

Notice the ProcessTweet job? We will implement that next but for now open up the routes/api.php file and add the following resource route

<?php
use Illuminate\Http\Request;
/*
|--------------------------------------------------------------------------
| API Routes
|--------------------------------------------------------------------------
|
| Here is where you can register API routes for your application. These
| routes are loaded by the RouteServiceProvider within a group which
| is assigned the "api" middleware group. Enjoy building your API!
|
*/
Route::middleware('auth:api')->get('/user', function (Request $request) {
 return $request->user();
});
Route::resource('/tweet','TweetController');

Now our Vue application (patience it’s coming) can interact with our backend. Now let’s add our ProcessTweet job and we will be finished on the backend.

ProcessTweet Job

In order to schedule the tweets to post at any given time you must utilize Laravel Jobs this will allow you to schedule your events to fire at a certain point in time. If you aren’t familiar with jobs and queues please look at my previous post because I will not be covering setting up queues in this tutorial, otherwise create a new job

php artisan make:job ProcessTweet

In the handle method we simply call the Twitter API and send the tweet then delete it from the database

<?php
namespace App\Jobs;
use Illuminate\Bus\Queueable;
use Illuminate\Queue\SerializesModels;
use Illuminate\Queue\InteractsWithQueue;
use Illuminate\Contracts\Queue\ShouldQueue;
use Illuminate\Foundation\Bus\Dispatchable;
use Twitter;
class ProcessTweet implements ShouldQueue
{
 use Dispatchable, InteractsWithQueue, Queueable, SerializesModels;
 public $tweet;
 /** * Create a new job instance.
 *
 * @return void
 */
 public function __construct(\App\Tweet $tweet)
 {
 //
 $this->tweet = $tweet;
 }
/**
 * Execute the job.
 *
 * @return void
 */
 public function handle()
 {
 //post the tweet
 Twitter::postTweet(['status' => $this->tweet->content, 'format' => 'json']);
 //delete the tweet from database
 \App\Tweet::destroy($this->tweet->id);
 }
}

Your backend is now functioning run your queue worker and test around with it or continue to creating the Vue application.

Getting The Front End Together

We need to add vue-resource to call our api so let’s add that first

npm install --save vue-resource

Also update the resources/js/app.js file

/**
 * First we will load all of this project's JavaScript dependencies which
 * includes Vue and other libraries. It is a great starting point when
 * building robust, powerful web applications using Vue and Laravel.
 */
require('./bootstrap');
window.Vue = require('vue');
const resource = require('vue-resource');
Vue.use(resource);
/**
 * Next, we will create a fresh Vue application instance and attach it to
 * the page. Then, you may begin adding components to this application
 * or customize the JavaScript scaffolding to fit your unique needs.
 */
Vue.component('tweet-component', require('./components/TweetComponent.vue'));
const app = new Vue({
 el: '#app'
});

As you can see the example-component has been replaced with the tweet-component rename your ExampleComponent.vue to TweetComponent.vue and update it with the following contents

<template>
 <div class="container">
 <div class="row">
 <div class="col-md-8 col-md-offset-2">
 <div class="panel panel-default">
 <div class="panel-heading">Tweet Scheduler</div>
<div class="panel-body">
 <div class="form-group">
 <input class="form-control" placeholder="Content" v-model="newTweet.content">
 </div>
 <div class="form-group">
 <input class="form-control" type="datetime-local" placeholder="Description" v-model="newTweet.publish_timestamp">
 </div>
<div class="form-group">
 <button class="btn btn-success" v-on:click="addTweet(newTweet)">Add Tweet</button>
 </div>
 <ul v-if="ready" class="list-group">
 <li v-for="post in tweets" class="list-group-item clearfix">
 {{post.content}}
 <span class="pull-right button-group">
 <button class=" btn btn-default" v-on:click="openEditTweet(post)">Edit</button>
 <button class=" btn btn-danger" v-on:click="deleteTweet(post)">Delete</button>
 </span>
 </li>
 </ul>
</div>
 </div>
 </div>
 </div>
 <!-- Modal -->
<div id="editModal" class="modal fade" role="dialog">
 <div class="modal-dialog">
<!-- Modal content-->
 <div class="modal-content">
 <div class="modal-header">
 <button type="button" class="close" data-dismiss="modal">&times;</button>
 <h4 class="modal-title">{{selectedTweet.content}}</h4>
 </div>
 <div class="modal-body">
 <div class="form-group">
 <input class="form-control" placeholder="Content" v-model="selectedTweet.content">
 </div>
 <div class="form-group">
 <input class="form-control" type="datetime-local" placeholder="Publish At" v-model="selectedTweet.publish_timestamp">
 </div>
 <div class="form-group">
 <button class="btn btn-info" v-on:click="editTweet(selectedTweet)">Edit Tweet</button>
 </div>
 </div>
 <div class="modal-footer">
 <button type="button" class="btn btn-default" data-dismiss="modal">Close</button>
 </div>
 </div>
</div>
 </div>
 </div>
</template>
<script>
export default {
 mounted() {
 console.log('Component mounted.')
 },
 data(){
 return {
 tweets: {},
 newTweet:{
 'content': '',
 'publish_timestamp': ''
 },
 selectedTweet:{
 'content': '',
 'publish_timestamp': ''
 },
 ready: false
 }
 },
 created(){
 this.$http.get('/api/tweet').then(function(data){
 this.tweets = data.data;
 this.ready = true;
 });
 },
 methods: {
 addTweet: function(tweet){
 this.$http.post('/api/tweet',tweet).then(function(data){
 this.tweets.unshift({content:tweet.content,publish_timestamp:tweet.publish_timestamp});
 });
 },
 editTweet: function(tweet){
 this.$http.put('/api/tweet/'+tweet.id,this.selectedTweet).then(function(data){
 let index = this.tweets.indexOf(tweet);
 this.tweets[index] = tweet;
 alert('Updated!');
 $("#editModal").modal('hide');
 });
 },
 openEditTweet: function(tweet){
 console.log(tweet);
 this.selectedTweet = tweet;
 $("#editModal").modal({show: true});
},
 deleteTweet: function(tweet){
 this.$http.delete('/api/tweet/'+tweet.id).then(function(data){
 let index = this.tweets.indexOf(tweet)
 this.tweets.splice(index, 1);
 });
}
}
}
</script>

Open up your resources/assets/sass/app.scss file and add the following fade transition

.fade-enter-active, .fade-leave-active {
 transition: opacity .5s
}
.fade-enter, .fade-leave-to /* .fade-leave-active below version 2.1.8 */ {
 opacity: 0
}

Run your npm build script as well as your queue worker and start tweeting! You can get the full source code here, and as always please subscribe to my blog via email or push notifications, share, and leave your comment below! If you would like to add a real-time nodejs microservice to your app then read here!

Posted on 51 Comments

Web Push Using Laravel 8 Notifications *Updated*

Web Push Is Awesome

No seriously! It’s a pivotal moment in web development. You see web push is a W3C protocol that allows websites to communicate with a user’s browser in the background, using this web developers can now do things such as: background push notifications, offline sync, and background analytics just to name few. The web push api follows the protocol and consist of 4 main stages:

  1. User Agent installs service worker
  2. App asks permission to show notifications
  3. Once permission is granted, subscribe to push
  4. Save subscription details on backend
  5. Send notification via Laravel notification

All the code can be seen on my Github and the live demo can be seen here!

Components Of Web Push

Implementing web push requires a true full-stack approach, on the back-end we have to:

  • Implement the WebPush notification channel
  • Set up VAPID keys (more details later)
  • Configure the user model to manage subscriptions
  • Fire the notifications

On the front end we must:

  • Create and install a service worker, the majority of our logic will be contained here and is responsible to handling push notifications
  • Give user prompt to accept permissions
  • Give user ability to send notification to self

I will break it down into back-end and front-end implementations as to not confuse you; let’s start with the back-end.
 

Creating The Backend

Create a blank Laravel application and run the following composer command to download the web push notification channel.

composer require laravel-notification-channels/webpush

The User Model

Next open up your user model and add the following.

<?php

namespace App\Models;

use Illuminate\Contracts\Auth\MustVerifyEmail;
use Illuminate\Database\Eloquent\Factories\HasFactory;
use Illuminate\Foundation\Auth\User as Authenticatable;
use Illuminate\Notifications\Notifiable;
use NotificationChannels\WebPush\HasPushSubscriptions;
use Laravel\Sanctum\HasApiTokens;

class User extends Authenticatable
{
use HasApiTokens, HasFactory, Notifiable, HasPushSubscriptions;

/**
* The attributes that are mass assignable.
*
* @var string[]
*/
protected $fillable = [
'name',
'email',
'password',
];

/**
* The attributes that should be hidden for serialization.
*
* @var array
*/
protected $hidden = [
'password',
'remember_token',
];

/**
* The attributes that should be cast.
*
* @var array
*/
protected $casts = [
'email_verified_at' => 'datetime',
];
}

This added HasPushSubscriptions trait allows the user model to receive push notifications. Without this trait the application won’t know what model to store the tokens on.


Next publish the migration with:

php artisan vendor:publish --provider="NotificationChannels\WebPush\WebPushServiceProvider" --tag="migrations"

Run the migrate command to create the necessary tables:

php artisan migrate

You can also publish the config file with the following command. We won’t be doing any customizations in part 1 but maybe down the line:

php artisan vendor:publish --provider="NotificationChannels\WebPush\WebPushServiceProvider" --tag="config"

Generate the VAPID keys with (required for browser authentication) with the following artisan command. This command will set VAPID_PUBLIC_KEY and VAPID_PRIVATE_KEYin your .env file. VAPID is a web push protocol that is needed if we want to send push notifications. Basically it voluntarily identifies itself to a push notification server. If you want to read the specification you can here:

php artisan webpush:vapid

The Notification Class

Next let’s create the notification being used. For now we will make a generic catch all notification. In later tutorials we may add some more custom notifications:

php artisan make:notification GenericNotification

Open up the file and replace with the following contents

<?php
namespace App\Notifications;
use Illuminate\Bus\Queueable;
use Illuminate\Notifications\Notification;
use Illuminate\Contracts\Queue\ShouldQueue;
use Illuminate\Notifications\Messages\MailMessage;
use NotificationChannels\WebPush\WebPushMessage;
use NotificationChannels\WebPush\WebPushChannel;
class GenericNotification extends Notification
{
    use Queueable;
    public $title, $body;
    /**
     * Create a new notification instance.
     *
     * @return void
     */
    public function __construct($title, $body)
    {
        //
        $this->title = $title;
        $this->body = $body;
    }
    /**
     * Get the notification's delivery channels.
     *
     * @param  mixed  $notifiable
     * @return array
     */
    public function via($notifiable)
    {
        return [WebPushChannel::class];
    }
    public function toWebPush($notifiable, $notification)
    {
      $time = \Carbon\Carbon::now();
        return WebPushMessage::create()
            // ->id($notification->id)
            ->title($this->title)
            ->icon(url('/push.png'))
            ->body($this->body);
            //->action('View account', 'view_account');
    }
}

Let’s break down this class. First off in the constructor() method we set the title and the body of the notification. This will be used to show the title and body of the push notification on the browser. The via() method we want to set the channel to the WebPushChannel. This should be self explanatory as we want to deliver via push notifications.

The API Routes

Next open up routes/api.php and fill out the API routes

<?php
use Illuminate\Http\Request;
use App\Models\User; /* |-------------------------------------------------------------------------- | API Routes |-------------------------------------------------------------------------- | | Here is where you can register API routes for your application. These | routes are loaded by the RouteServiceProvider within a group which | is assigned the "api" middleware group. Enjoy building your API! | */ Route::middleware('auth:api')->get('/user', function (Request $request) { return $request->user(); }); Route::post('/save-subscription/{id}',function($id, Request $request){ $user = \App\Model\User::findOrFail($id); $user->updatePushSubscription($request->input('endpoint'), $request->input('keys.p256dh'), $request->input('keys.auth')); $user->notify(new \App\Notifications\GenericNotification("Welcome To WebPush", "You will now get all of our push notifications")); return response()->json([ 'success' => true ]); }); Route::post('/send-notification/{id}', function($id, Request $request){ $user = \App\Model\User::findOrFail($id); $user->notify(new \App\Notifications\GenericNotification($request->title, $request->body)); return response()->json([ 'success' => true ]); });

As you can see, we only added two additional routes to the application, both of which are POST. The first route

/save-subscription/{id}

Is responsible for saving the web push subscription from the client. Once the client requests web push access a set of keys are generated, which must be sent to our server. Using the updatePushSubscription() method that comes with the trait added to the user model, we can set the webpush subscription for whatever url the user is requesting from. The updatePushSubscription method takes 3 parameters:

  • endpoint (required): This is the created on the front end when registering for push notifications
  • key (optional) : Needed to encrypt data, only encrypted messages can have a payload
  • token (optional): Needed to encrypt data, only encrypted messages can have a payload

That’s it for the back end! In the next tutorial we will make a Vue.js application and register for push notifications and test it out! If you enjoyed my content please like/subscribe/share! If you want another cool project learn how to stream your desktop to a recording or to YouTube!