Speech Recognition & Speech Synthesis In The Browser With Web Speech API
Voice apps are now first-class citizens on the web thanks to the Speech Recognition and the Speech Synthesis interfaces which are a part of the bigger Web Speech API. Taken from the MDN docs
The Web Speech API makes web apps able to handle voice data. There are two components to this API:
Brief on Web Speech API from MDN
- Speech recognition is accessed via the
SpeechRecognitioninterface, which provides the ability to recognize voice context from an audio input (normally via the device’s default speech recognition service) and respond appropriately. Generally you’ll use the interface’s constructor to create a newSpeechRecognitionobject, which has a number of event handlers available for detecting when speech is input through the device’s microphone. TheSpeechGrammarinterface represents a container for a particular set of grammar that your app should recognize. Grammar is defined using JSpeech Grammar Format (JSGF.)- Speech synthesis is accessed via the
SpeechSynthesisinterface, a text-to-speech component that allows programs to read out their text content (normally via the device’s default speech synthesizer.) Different voice types are represented bySpeechSynthesisVoiceobjects, and different parts of text that you want to be spoken are represented bySpeechSynthesisUtteranceobjects. You can get these spoken by passing them to theSpeechSynthesis.speak()method.
So basically with the Web Speech API you can work with voice data. You can make your apps speak to its users and you can run commands based on what your user speaks. This opens up a host of opportunities for voice-activated CLIENT-SIDE apps. I love building open-source software, so I decided to create an NPM package to work with the Web Speech API called SpeechKit and I couldn’t wait to share it with you! I suppose this is a continuation of Creating A Voice Powered Note App Using Web Speech
Simplifying The Process With SpeechKit
I decided starting this year I would contribute more to the open-source community and provide packages (primarily Javascript, PHP, and Rust) to the world to use. I use the Web Speech API a lot in my personal projects and so why not make it an NPM package? You can find the source code here.
Listen To Some Hacker Music While You Code
Features
- Speak Commands
- Listen for voice commands
- Add your own grammar
- Transcribe words and output as file.
- Generate SSML from text
npm install @mastashake08/speech-kit
Import
import SpeechKit from '@mastashake08/speech-kit'
Instantiate A New Instance
new SpeechKit(options)
listen()
Start listening for speech recognition.
stopListen()
Stop listening for speech recognition.
speak(text)
Use Speech Synthesis to speak text.
| Param | Type | Description |
|---|---|---|
| text | string |
Text to be spoken |
getResultList() ⇒ SpeechRecognitionResultList
Get current SpeechRecognition resultsList.
Returns: SpeechRecognitionResultList – – List of Speech Recognition results
getText() ⇒ string
Return text
Returns: string – resultList as text string
getTextAsFile() ⇒ Blob
Return text file with results.
Returns: Blob – transcript
getTextAsJson() ⇒ object
Return text as JSON.
Returns: object – transcript
addGrammarFromUri()
Add grammar to the SpeechGrammarList from a URI.
Params: string uri – URI that contains grammar
addGrammarFromString()
Add grammar to the SpeechGrammarList from a Grammar String.
Params: string grammar – String containing grammar
getGrammarList() ⇒ SpeechGrammarList
Return current SpeechGrammarList.
Returns: SpeechGrammarList – current SpeechGrammarList object
getRecognition() ⇒ SpeechRecognition
Return the urrent SpeechRecognition object.
Returns: SpeechRecognition – current SpeechRecognition object
getSynth() ⇒ SpeechSynthesis
Return the current Speech Synthesis object.
Returns: SpeechSynthesis – current instance of Speech Synthesis object
getVoices() ⇒ Array<SpeechSynthesisVoice>
Return the current voices available to the user.
Returns: Array<SpeechSynthesisVoice> – Array of available Speech Synthesis Voices
setSpeechText()
Set the SpeechSynthesisUtterance object with the text that is meant to be spoken.
Params: string text – Text to be spoken
setSpeechVoice()
Set the SpeechSynthesisVoice object with the desired voice.
Params: SpeechSynthesisVoice voice – Voice to be spoken
getCurrentVoice() ⇒ SpeechSynthesisVoice
Return the current voice being used in the utterance.
Returns: SpeechSynthesisVoice – current voice
Example Application
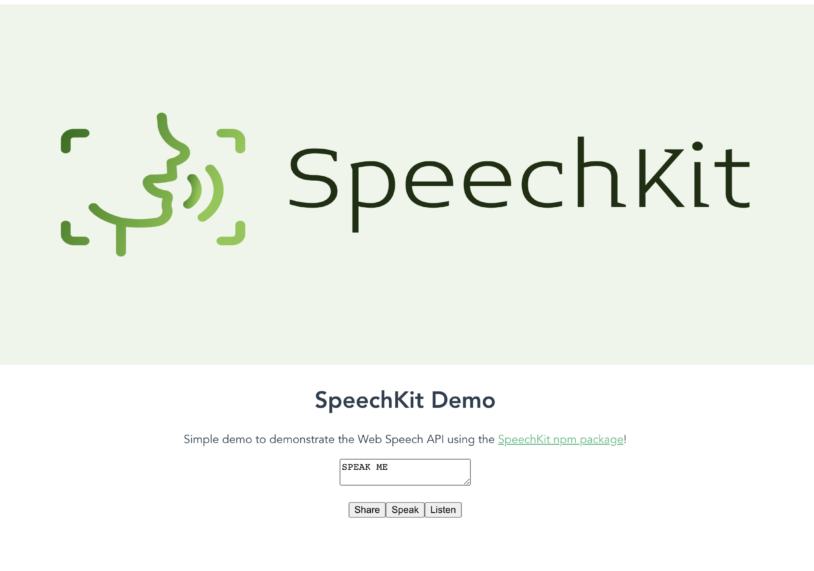
In this example vue.js application there will be a text box with three buttons underneath, when the user clicks the listen button, SpeechKit will start listening to the user. As speech is detected, the text will appear in the text box. The first button under the textbox will tell the browser to share the page, the second button will speak the text in the textbox while the third button will control recording.

I created this in Vue.js and (for sake of time and laziness) I reused all of the defaul components and rewrote the HelloWorld component. So let’s get started by creating a new Vue application.
Creating The Application
Open up your terminal and input the following command to create a new vue application:
vue create speech-kit-demoIt doesn’t really matter what settings you choose, after you get that squared away, now it is time to add our dependecy.
Installing SpeechKit
Still inside your terminal we will add the SpeechKit dependency to our package.json file with the following command:
npm install @mastashake08/speech-kit
Now with that out of the way we can begin creating our component functionality.
Editing HelloWorld.vue
Open up your HelloWorld.vue file in your components/ folder and change it to look like this:
<template>
  <div class="hello">
    <h1>{{ msg }}</h1>
    <p>
      Simple demo to demonstrate the Web Speech API using the
      <a href="https://github.com/@mastashake08/speech-kit" target="_blank" rel="noopener">SpeechKit npm package</a>!
    </p>
    <textarea v-model="voiceText"/>
    <ul>
      <button @click="share" >Share</button>
      <button @click="speak">Speak</button>
      <button @click="listen" v-if="!isListen">Listen</button>
      <button @click="stopListen" v-else>Stop Listen</button>
    </ul>
  </div>
</template>

<script>
import SpeechKit from '@mastashake08/speech-kit'
export default {
  name: 'HelloWorld',
  props: {
    msg: String
  },
  mounted () {
    this.sk = new SpeechKit({rate: 0.85})
    document.addEventListener('onspeechkitresult', (e) => this.getText(e))
  },
  data () {
    return {
      voiceText: 'SPEAK ME',
      sk: {},
      isListen: false
    }
  },
  methods: {
    share () {
      const text = `Check out the SpeechKit Demo and speak this text! ${this.voiceText} ${document.URL}`
      try {
        if (!navigator.canShare) {
          this.clipBoard(text)
        } else {
          navigator.share({
            text: text,
            url: document.URL
          })
        }
      } catch (e) {
        this.clipBoard(text)
      }
    },
    async clipBoard (text) {
      const type = "text/plain";
      const blob = new Blob([text], { type });

      const data = [new window.ClipboardItem({ [type]: blob })];
      await navigator.clipboard.write(data)
      alert ('Text copied to clipboard')
    },
    speak () {
      this.sk.speak(this.voiceText)
    },
    listen () {
      this.sk.listen()
      this.isListen = !this.isListen
    },
    stopListen () {
      this.sk.stopListen()
      this.isListen = !this.isListen
    },
    getText (evt) {
      this.voiceText = evt.detail.transcript
    }
  }
}
</script>

<!-- Add "scoped" attribute to limit CSS to this component only -->
<style scoped>
h3 {
  margin: 40px 0 0;
}
ul {
  list-style-type: none;
  padding: 0;
}
li {
  display: inline-block;
  margin: 0 10px;
}
a {
  color: #42b983;
}
</style>
As you can see the almost all of the functionality is being offloaded to the SpeechKit library. You can see a live version of this at https://mastashake08.github.io/speech-kit-demo/ . In the mount() method we initialize our SpeechKit instance and add an event listener on the document to listen for the onspeechkitresult event emitted from the SpeechKit class which dispatches everytime there is an availble transcript from speech recognition. The listen() and stopListen() functions simply call the SpeechKit functions and toggle a boolean indicating recording is in process. Finally the share() function uses the Web Share API to share the URL if available, otherwise it defaults to using the Clipboard API and copying the text to the user’s clipboard for manual sharing.
Want To See More Tutorials?
Join my newsletter and get weekly updates from my blog delivered straight to your inbox.
Check The Shop!
Consider purchasing an item from the #CodeLife shop, all proceeds go towards our coding initiatives.
-
Product on sale
 GPT Genie: A Solo Developer’s Guide to Mastering ChatGPT$1.99
 -
 These Fingers Unisex t-shirt$23.55 – $31.55
 -
 #CodeLife AirPods case$15.00
 -
 #CodeLife Laptop Sleeve$25.00 – $28.00
 -
 #CodeLife Unisex T-Shirt$20.00 – $22.00
 -
 #CodeLife Unisex Joggers$31.50 – $33.50
 -
 Cuffed #CodeLife Beanie$20.00
 -
 Unisex #CodeLife Hoodie$36.50 – $38.50
 -
 #CodeLife Unisex Sweatshirt$30.00 – $38.00
 -
 Embroidered #CodeLife Champion Backpack$44.50
Follow Me On Social Media
Follow Me On Youtube!
Get Your Next Domain Cheap & Support The Channel
I use Namecheap for all of my domains! Whenever I need a cheap solution for a proof-of-concept project I grab a domain name for as little as $1! When you sign up and buy your first domain with Namecheap I get a commission, it’s a great way to get a quality service and support this platform!
Get Your Next Domain Cheap
CLICK HERE
Join The Newsletter
By joining the newsletter, you get first access to all of my blogs, events, and other brand-related content delivered directly to your inbox. It’s 100% free and you can opt out at any time!
Check The Shop
You can also consider visiting the official #CodeLife shop! I have my own clothing/accessory line for techies as well as courses designed by me covering a range of software engineering topics.
-
Product on sale
 GPT Genie: A Solo Developer’s Guide to Mastering ChatGPT$1.99
 -
 These Fingers Unisex t-shirt$23.55 – $31.55
 -
 #CodeLife AirPods case$15.00
 -
 Embroidered #CodeLife Champion Backpack$44.50
 -
 #CodeLife Laptop Sleeve$25.00 – $28.00
 -
 #CodeLife Unisex T-Shirt$20.00 – $22.00
 -
 #CodeLife Unisex Joggers$31.50 – $33.50
 -
 Cuffed #CodeLife Beanie$20.00
 -
 Unisex #CodeLife Hoodie$36.50 – $38.50

