Posted on 2 Comments

SpeechKit: A Javascript Package For The Web Speech API (Speech Synthesis & Speech Recognition)

Speech Recognition & Speech Synthesis In The Browser With Web Speech API

Voice apps are now first-class citizens on the web thanks to the Speech Recognition and the Speech Synthesis interfaces which are a part of the bigger Web Speech API. Taken from the MDN docs

The Web Speech API makes web apps able to handle voice data. There are two components to this API:

  • Speech recognition is accessed via the SpeechRecognition interface, which provides the ability to recognize voice context from an audio input (normally via the device’s default speech recognition service) and respond appropriately. Generally you’ll use the interface’s constructor to create a new SpeechRecognition object, which has a number of event handlers available for detecting when speech is input through the device’s microphone. The SpeechGrammar interface represents a container for a particular set of grammar that your app should recognize. Grammar is defined using JSpeech Grammar Format (JSGF.)
  • Speech synthesis is accessed via the SpeechSynthesis interface, a text-to-speech component that allows programs to read out their text content (normally via the device’s default speech synthesizer.) Different voice types are represented by SpeechSynthesisVoice objects, and different parts of text that you want to be spoken are represented by SpeechSynthesisUtterance objects. You can get these spoken by passing them to the SpeechSynthesis.speak() method.
Brief on Web Speech API from MDN

So basically with the Web Speech API you can work with voice data. You can make your apps speak to its users and you can run commands based on what your user speaks. This opens up a host of opportunities for voice-activated CLIENT-SIDE apps. I love building open-source software, so I decided to create an NPM package to work with the Web Speech API called SpeechKit and I couldn’t wait to share it with you! I suppose this is a continuation of Creating A Voice Powered Note App Using Web Speech

Simplifying The Process With SpeechKit

I decided starting this year I would contribute more to the open-source community and provide packages (primarily Javascript, PHP, and Rust) to the world to use. I use the Web Speech API a lot in my personal projects and so why not make it an NPM package? You can find the source code here.

Listen To Some Hacker Music While You Code

Follow me on Spotify I make Tech Trap music

Features

  • Speak Commands
  • Listen for voice commands
  • Add your own grammar
  • Transcribe words and output as file.
  • Generate SSML from text
npm install @mastashake08/speech-kit

Import

import SpeechKit from '@mastashake08/speech-kit'

Instantiate A New Instance

new SpeechKit(options)

listen()

Start listening for speech recognition.

stopListen()

Stop listening for speech recognition.

speak(text)

Use Speech Synthesis to speak text.

Param Type Description
text string Text to be spoken

getResultList() ⇒ SpeechRecognitionResultList

Get current SpeechRecognition resultsList.

Returns: SpeechRecognitionResultList – – List of Speech Recognition results

getText() ⇒ string

Return text

Returns: string – resultList as text string

getTextAsFile() ⇒ Blob

Return text file with results.

Returns: Blob – transcript

getTextAsJson() ⇒ object

Return text as JSON.

Returns: object – transcript

addGrammarFromUri()

Add grammar to the SpeechGrammarList from a URI.

Params: string uri – URI that contains grammar

addGrammarFromString()

Add grammar to the SpeechGrammarList from a Grammar String.

Params: string grammar – String containing grammar

getGrammarList() ⇒ SpeechGrammarList

Return current SpeechGrammarList.

Returns: SpeechGrammarList – current SpeechGrammarList object

getRecognition() ⇒ SpeechRecognition

Return the urrent SpeechRecognition object.

Returns: SpeechRecognition – current SpeechRecognition object

getSynth() ⇒ SpeechSynthesis

Return the current Speech Synthesis object.

Returns: SpeechSynthesis – current instance of Speech Synthesis object

getVoices() ⇒ Array<SpeechSynthesisVoice>

Return the current voices available to the user.

Returns: Array<SpeechSynthesisVoice> – Array of available Speech Synthesis Voices

setSpeechText()

Set the SpeechSynthesisUtterance object with the text that is meant to be spoken.

Params: string text – Text to be spoken

setSpeechVoice()

Set the SpeechSynthesisVoice object with the desired voice.

Params: SpeechSynthesisVoice voice – Voice to be spoken

getCurrentVoice() ⇒ SpeechSynthesisVoice

Return the current voice being used in the utterance.

Returns: SpeechSynthesisVoice – current voice

Example Application

In this example vue.js application there will be a text box with three buttons underneath, when the user clicks the listen button, SpeechKit will start listening to the user. As speech is detected, the text will appear in the text box. The first button under the textbox will tell the browser to share the page, the second button will speak the text in the textbox while the third button will control recording.
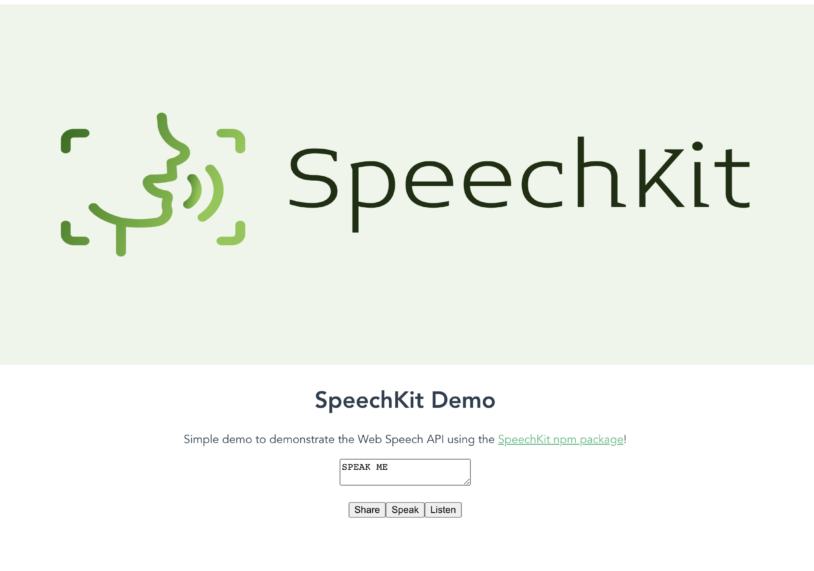
Home page from the github.io page

I created this in Vue.js and (for sake of time and laziness) I reused all of the defaul components and rewrote the HelloWorld component. So let’s get started by creating a new Vue application.

Creating The Application

Open up your terminal and input the following command to create a new vue application:

vue create speech-kit-demo

It doesn’t really matter what settings you choose, after you get that squared away, now it is time to add our dependecy.

Installing SpeechKit

Still inside your terminal we will add the SpeechKit dependency to our package.json file with the following command:

npm install @mastashake08/speech-kit

Now with that out of the way we can begin creating our component functionality.

Editing HelloWorld.vue

Open up your HelloWorld.vue file in your components/ folder and change it to look like this:

<template>
  <div class="hello">
    <h1>{{ msg }}</h1>
    <p>
      Simple demo to demonstrate the Web Speech API using the
      <a href="https://github.com/@mastashake08/speech-kit" target="_blank" rel="noopener">SpeechKit npm package</a>!
    </p>
    <textarea v-model="voiceText"/>
    <ul>
      <button @click="share" >Share</button>
      <button @click="speak">Speak</button>
      <button @click="listen" v-if="!isListen">Listen</button>
      <button @click="stopListen" v-else>Stop Listen</button>
    </ul>
  </div>
</template>

<script>
import SpeechKit from '@mastashake08/speech-kit'
export default {
  name: 'HelloWorld',
  props: {
    msg: String
  },
  mounted () {
    this.sk = new SpeechKit({rate: 0.85})
    document.addEventListener('onspeechkitresult', (e) => this.getText(e))
  },
  data () {
    return {
      voiceText: 'SPEAK ME',
      sk: {},
      isListen: false
    }
  },
  methods: {
    share () {
      const text = `Check out the SpeechKit Demo and speak this text! ${this.voiceText} ${document.URL}`
      try {
        if (!navigator.canShare) {
          this.clipBoard(text)
        } else {
          navigator.share({
            text: text,
            url: document.URL
          })
        }
      } catch (e) {
        this.clipBoard(text)
      }
    },
    async clipBoard (text) {
      const type = "text/plain";
      const blob = new Blob([text], { type });

      const data = [new window.ClipboardItem({ [type]: blob })];
      await navigator.clipboard.write(data)
      alert ('Text copied to clipboard')
    },
    speak () {
      this.sk.speak(this.voiceText)
    },
    listen () {
      this.sk.listen()
      this.isListen = !this.isListen
    },
    stopListen () {
      this.sk.stopListen()
      this.isListen = !this.isListen
    },
    getText (evt) {
      this.voiceText = evt.detail.transcript
    }
  }
}
</script>

<!-- Add "scoped" attribute to limit CSS to this component only -->
<style scoped>
h3 {
  margin: 40px 0 0;
}
ul {
  list-style-type: none;
  padding: 0;
}
li {
  display: inline-block;
  margin: 0 10px;
}
a {
  color: #42b983;
}
</style>

As you can see the almost all of the functionality is being offloaded to the SpeechKit library. You can see a live version of this at https://mastashake08.github.io/speech-kit-demo/ . In the mount() method we initialize our SpeechKit instance and add an event listener on the document to listen for the onspeechkitresult event emitted from the SpeechKit class which dispatches everytime there is an availble transcript from speech recognition. The listen() and stopListen() functions simply call the SpeechKit functions and toggle a boolean indicating recording is in process. Finally the share() function uses the Web Share API to share the URL if available, otherwise it defaults to using the Clipboard API and copying the text to the user’s clipboard for manual sharing.

Want To See More Tutorials?

Join my newsletter and get weekly updates from my blog delivered straight to your inbox.

Check The Shop!

Consider purchasing an item from the #CodeLife shop, all proceeds go towards our coding initiatives.

Follow Me On Social Media

Follow Me On Youtube!

Follow my YouTube account

Get Your Next Domain Cheap & Support The Channel

I use Namecheap for all of my domains! Whenever I need a cheap solution for a proof-of-concept project I grab a domain name for as little as $1! When you sign up and buy your first domain with Namecheap I get a commission, it’s a great way to get a quality service and support this platform!

Get Your Next Domain Cheap
CLICK HERE

Become A Sponsor

Open-source work is free to use but it is not free to develop. If you enjoy my content and would like to see more please consider becoming a sponsor on Github or Patreon! Not only do you support me but you are funding tech programs for at risk youth in Louisville, Kentucky.

Join The Newsletter

By joining the newsletter, you get first access to all of my blogs, events, and other brand-related content delivered directly to your inbox. It’s 100% free and you can opt out at any time!

Check The Shop

You can also consider visiting the official #CodeLife shop! I have my own clothing/accessory line for techies as well as courses designed by me covering a range of software engineering topics.

Posted on 3 Comments

Create A Point Of Sales System With Laravel, Vue and Stripe – Part 1

What Is A Point Of Sales System?

Creating web apps for the fun of it is cool, but we all need to get paid right?! This new series explores how to create a point of sales system with Laravel, Vue.js and the Stripe API. A point of sales system (or POS) is software solution that allows you to process money. In this case we will use Stripe to process credit/debit cards as well as manage inventory. Using a fullstack Laravel and Vue.js application we can collect money, send invoices and get paid all in one location. By the time this series is over you will have used:

  • Laravel Passport
  • Laravel Socialite
  • Stripe Charge API
  • Stripe Product API
  • Stripe Subscription API


All of the source code is available at https://github.com/mastashake08/laravel-vue-pos. In part one I explain what it is we are building today as well as setting up the ground work for the future. Watch the video below and don’t forget to subscribe to the channel and share the video! Lastly don’t forget to check out the live version right here! Now on to part 2.

Posted on 3 Comments

Create A Point Of Sales System With Vue/Laravel + Stripe

Point Of Sales In The Palm Of Your Hand

In today’s tutorial I will be creating a point of sales system utilizing Vue and Laravel with Stripe being our payment processor. The program will allow a stripe account holder to take payments and if on mobile will allow them to scan the card via the device’s camera. It will utilize Laravel Passport for secure API calls and Stripe to handle the payments.

Installing The Dependencies

The app uses two dependencies as of now and those are Stipe and Laravel Passport install them using composer
 

composer require laravel/passportstripe/stripe-php

Now run the migrations (I’m using Laravel 5.5 so the packages are auto-discovered)

php artisan migrate

Now open your app/User.php model and edit the following

<?php
namespace App;
use Laravel\Passport\HasApiTokens;
use Illuminate\Notifications\Notifiable;
use Illuminate\Foundation\Auth\User as Authenticatable;
class User extends Authenticatable
{
    use HasApiTokens, Notifiable;
}

Next register the Passport routes in your AuthServiceProvider

<?php
namespace App\Providers;
use Laravel\Passport\Passport;
use Illuminate\Support\Facades\Gate;
use Illuminate\Foundation\Support\Providers\AuthServiceProvider as ServiceProvider;
class AuthServiceProvider extends ServiceProvider
{
    /**
     * The policy mappings for the application.
     *
     * @var array
     */
    protected $policies = [
        'App\Model' => 'App\Policies\ModelPolicy',
    ];
    /**
     * Register any authentication / authorization services.
     *
     * @return void
     */
    public function boot()
    {
        $this->registerPolicies();
        Passport::routes();
    }
}

Register the api driver in config/auth.php

'guards' => [
    'web' => [
        'driver' => 'session',
        'provider' => 'users',
    ],
    'api' => [
        'driver' => 'passport',
        'provider' => 'users',
    ],
],

Lastly set the web middleware group

'web' => [
    // Other middleware...
    \Laravel\Passport\Http\Middleware\CreateFreshApiToken::class,
],

Controller

This application only needs one external controller

php artisan make:controller StripeController

This controller will only contain 2 methods __construct() and charge(). The __construct method will set the StripeApiKey and the charge method actually makes the charge

<?php
namespace App\Http\Controllers;
use Illuminate\Http\Request;
class StripeController extends Controller
{
 //
 public function __construct(){
 \Stripe\Stripe::setApiKey(env('STRIPE_SECRET'));
 }
public function charge(Request $request){
 try {
 // Use Stripe's library to make requests...
 $token = \Stripe\Token::create(array(
 "card" => array(
 "number" => $request->card['card_number'],
 "exp_month" => $request->card['expiry_month'],
 "exp_year" => $request->card['expiry_year'],
 "cvc" => $request->card['cvv']
 )
 ));
 \Stripe\Charge::create(array(
 "amount" => $request->amount * 100,
 "currency" => "usd",
 "source" => $token, // obtained with Stripe.js
 "description" => $request->description,
 "receipt_email" => $request->email
 ));
 return response()->json([
 'success' => true
 ]);
 } catch(\Stripe\Error\Card $e) {
 // Since it's a decline, \Stripe\Error\Card will be caught
 return response()->json($e->getJsonBody());
 } catch (\Stripe\Error\RateLimit $e) {
 // Too many requests made to the API too quickly
 return response()->json($e->getJsonBody());
 } catch (\Stripe\Error\InvalidRequest $e) {
 // Invalid parameters were supplied to Stripe's API
 return response()->json($e->getJsonBody());
 } catch (\Stripe\Error\Authentication $e) {
 // Authentication with Stripe's API failed
 // (maybe you changed API keys recently)
 return response()->json($e->getJsonBody());
 } catch (\Stripe\Error\ApiConnection $e) {
 // Network communication with Stripe failed
 return response()->json($e->getJsonBody());
 } catch (\Stripe\Error\Base $e) {
 // Display a very generic error to the user, and maybe send
 // yourself an email
 return response()->json($e->getJsonBody());
 } catch (Exception $e) {
 // Something else happened, completely unrelated to Stripe
 return response()->json($e->getJsonBody());
 }
 }
}

The controller is now finished let’s create the API routes

API Routes

Open the routes/api.php file and add the following routes

<?php
use Illuminate\Http\Request;
/*
|--------------------------------------------------------------------------
| API Routes
|--------------------------------------------------------------------------
|
| Here is where you can register API routes for your application. These
| routes are loaded by the RouteServiceProvider within a group which
| is assigned the "api" middleware group. Enjoy building your API!
|
*/
Route::middleware('auth:api')->get('/user', function (Request $request) {
 return $request->user();
});
Route::middleware('auth:api')->post('/charge','StripeController@charge');

The backend is now complete now for the front end.

Vue Component

Get rid of the example component and create a new one called ChargeComponent and add the following content

<template>
 <div class="container">
 <div class="row">
 <div class="col-md-8 col-md-offset-2">
 <div class="panel panel-default">
 <div class="panel-heading">Make A Charge</div>
<div class="panel-body">
 <fieldset>
 <div class="form-group">
 <label class="col-sm-3 control-label" for="amount">Amount</label>
 <div class="col-sm-9">
 <input type="number" class="form-control" id="amount" placeholder="Amount To Charge" v-model="amount">
 </div>
 </div>
 <div class="form-group">
 <label class="col-sm-3 control-label" for="email">Email</label>
 <div class="col-sm-9">
 <input type="email" class="form-control" id="email" placeholder="Email Receipt" v-model="email">
 </div>
 </div>
 <div class="form-group">
 <label class="col-sm-3 control-label" for="description">Description</label>
 <div class="col-sm-9">
 <input type="text" class="form-control" id="description" placeholder="Credit Card Description" v-model="description">
 </div>
 </div>
 <div class="form-group">
 <label class="col-sm-3 control-label" for="card-number">Card Number</label>
 <div class="col-sm-9">
 <input type="text" class="form-control" name="card-number" id="card-number" placeholder="Debit/Credit Card Number" autocomplete="cc-number" v-model="card.card_number">
 </div>
 </div>
 <div class="form-group">
 <label class="col-sm-3 control-label" for="expiry-month">Expiration Date</label>
 <div class="col-sm-9">
 <div class="row">
 <div class="col-xs-3">
 <select class="form-control col-sm-2" name="expiry-month" id="expiry-month" autocomplete="cc-exp-month" v-model="card.expiry_month">
 <option>Month</option>
 <option value="01">Jan (01)</option>
 <option value="02">Feb (02)</option>
 <option value="03">Mar (03)</option>
 <option value="04">Apr (04)</option>
 <option value="05">May (05)</option>
 <option value="06">June (06)</option>
 <option value="07">July (07)</option>
 <option value="08">Aug (08)</option>
 <option value="09">Sep (09)</option>
 <option value="10">Oct (10)</option>
 <option value="11">Nov (11)</option>
 <option value="12">Dec (12)</option>
 </select>
 </div>
 <div class="col-xs-3">
 <select class="form-control" name="expiry-year" autocomplete="cc-exp-year" v-model="card.expiry_year">
 <option value="17">2017</option>
 <option value="18">2018</option>
 <option value="19">2019</option>
 <option value="20">2020</option>
 <option value="21">2021</option>
 <option value="22">2022</option>
 <option value="23">2023</option>
 </select>
 </div>
 </div>
 </div>
 </div>
 <div class="form-group">
 <label class="col-sm-3 control-label" for="cvv">Card CVV</label>
 <div class="col-sm-3">
 <input type="text" class="form-control" name="cvv" id="cvv" placeholder="Security Code" autocomplete="cvc" v-model="card.cvv">
 </div>
 </div>
 <div class="form-group">
 <div class="col-sm-offset-3 col-sm-9">
 <button type="button" class="btn btn-success" v-on:click="createCharge">Pay Now</button>
 </div>
 </div>
 </fieldset>
 </div>
 </div>
 </div>
 </div>
 </div>
</template>
<script>
 export default {
 mounted() {
 console.log('Component mounted.')
 },
 data(){
 return{
 card: {
 card_number: null,
 expiry_year: null,
 expiry_month: null,
 cvv: null
 },
 amount: 0,
 email: null,
 description: null
 }
 },
 methods: {
 createCharge: function(){
 axios.post('/api/charge',{card: this.card, amount: this.amount, description: this.description})
 .then(function(data){
 alert('Success!')
 }).catch(function(error){
 alert(error.message);
 });
 }
 }
 }
</script>

Edit the app.js file to match the following

/**
 * First we will load all of this project's JavaScript dependencies which
 * includes Vue and other libraries. It is a great starting point when
 * building robust, powerful web applications using Vue and Laravel.
 */
require('./bootstrap');
window.Vue = require('vue');
/**
 * Next, we will create a fresh Vue application instance and attach it to
 * the page. Then, you may begin adding components to this application
 * or customize the JavaScript scaffolding to fit your unique needs.
 */
Vue.component('charge-component', require('./components/ChargeComponent.vue'));
const app = new Vue({
 el: '#app'
 });

now install the npm dependencies and run mix

npm install && npm run dev

Enjoy your new app! You can fork the source code here! Be sure to like/subscribe/share and if you want to show your support please check out the shop!

Posted on Leave a comment

Styling Our About Me Page With CSS

[callaction url=”https://www.youtube.com/user/JPlaya01″ background_color=”#333333″ text_color=”#ffffff” button_text=”Go Now” button_background_color=”#e64429″]Subscribe To My Youtube Page[/callaction]

Cascading Style Sheets

Cascading Style Sheets or CSS is the language that describes how HTML documents are displayed. In other words it is the language that styles the web. It is the 2nd cornerstone of web development, with the 3rd being javascript. Like with all my tutorials I will give you a brief introduction to the language and teach you the innerworks bit by bit over various demos.

Our Current Situation

If you have been following along then you should have a basic about me page built. Here is mine:

<!DOCTYPE html>
<html>
<head>
<title>About Jyrone Parker</title>
</head>
<body>
<h1>Hi I Am Jyrone Parker</h1>
<img src="https://en.gravatar.com/userimage/70717632/53adbdecac04d4ffbe3449993c901a73.jpg?size=200"/>
<audio loop autoplay>
<source src="http://freesound.org/data/previews/353/353234_3162775-lq.mp3" type="audio/mpeg">
Your browser does not support the audio element.
</audio>
<p> I am CEO and lead engineer at J Computer Solutions LLC, a consultancy that places software and DevOps engineers at companies in need.
<div itemscope itemtype="http://schema.org/LocalBusiness">
<h1 itemprop="name">Contact Me</h1>
Phone: <span itemprop="telephone">
<a href="tel:+18594024863"> 859-402-4863</a>
</span>
</div>
</p>
</body>
</html> 

As it stands currently this page is UGLY! I’m going to import a CSS framework to start off with. A framework basically is a bunch a code that boilerplates stuff for you, so you can focus more on the core of what you are trying to accomplish. My framework of choice is Bootstrap the way you add CSS code to your HTML markup is via the <link> tag. In the head of your document add the following:

<!-- Latest compiled and minified CSS -->
<link rel="stylesheet" href="https://maxcdn.bootstrapcdn.com/bootstrap/3.3.7/css/bootstrap.min.css" integrity="sha384-BVYiiSIFeK1dGmJRAkycuHAHRg32OmUcww7on3RYdg4Va+PmSTsz/K68vbdEjh4u" crossorigin="anonymous">

This will load the latest bootstrap css into your webpage. Notice the href does not have to be a remote address. If you have a folder called css/ and downloaded the bootstrap code you can call it like href=”css/bootstrap.css”.

Prepping The HTML

Before we do any styling we need to add a few <meta> tags to the top of the <head> section for Bootstrap to work properly. Please add  the following right below the <head> tag:


<meta charset="utf-8">
<meta http-equiv="X-UA-Compatible" content="IE=edge">
<meta name="viewport" content="width=device-width, initial-scale=1">

Elements, IDs & Classes

CSS can interact with the HTML document via elements, ids, and classes. An Element is a tag such as <body> or <h1>. An id points to one specific tag on an HTML document and ONLY one such as <title id=”about-me-page-title”>. A class applies a style to every element with that class AND everything in between that element such as


<div class="cool-section">
<p id="cool-paragraph">
Some text goes here
</p>
</div>

In this example both <div> AND  <p> have the class “cool-section” applied to it because <p> is a child of <div>; However <p> has addition styling that <div> does not because of its id.
 

Creating main.css

I know I said we would be using Bootstrap to do our styling, but I want to make one addition to the background color of the body. Create a folder called css and in that folder create a folder called main.css. In a CSS file the syntax is as follows


element{
property:value;
}

or


#id{
property:value;
}
.class{
property:value;
}

Since I want to change the body element and I want to change the background color to this nice gray I like I put in the following rule:<pre><code class=”language-css”>


body{
background-color: #667;
}

If you are wondering how #667 = gray, it’s because HTML uses hexadecimal for color, here is a good reference if you need it http://www.w3schools.com/colors/colors_picker.asp. Save the file and right below the Bootstrap link place this link

<link rel="stylesheet" href="css/main.css">

Navigation Bar

One of the bootstrap components is the nav bar. HTML5 added a <nav> tag that defines a set of navigation links for your document. Copying the example snippet from the Bootstrap website and removed what wasn’t needed.


<nav class="navbar navbar-default">
<div class="container-fluid">
<!-- Brand and toggle get grouped for better mobile display -->
<div class="navbar-header">
<button type="button" class="navbar-toggle collapsed" data-toggle="collapse" data-target="#bs-example-navbar-collapse-1" aria-expanded="false">
<span class="sr-only">Toggle navigation</span>
<span class="icon-bar"></span>
</button>
<a class="navbar-brand" href="#">Jyrone Parker</a>
</div>
</div><!-- /.container-fluid -->
</nav>

Ignore all of the data- attributes right now that’s javascript related, but notice all of the classes in this section these are pre-defined Bootstrap styles. I suggest getting familiar with the documentation. Add this nav bar right below your opening <body> tag refresh your page and notice the changes.
 

Styling Content

The first thing I want to do is make my content a fixed width, this will give it a consistent look across devices. To do this I will wrap all my content (minus nav) in a div with class container. I also want everything in this div to stand out. Luckily Bootstrap has a class for content you want to stand out it’s called jumbotron. Lastly we want all text to be centered, Bootstrap provides a text-center defintion.
<div class=”container jumbotron text-center”>
//previous code
</div>
The finishing touch will be preformed on our profile picture. Bootstrap offers some img classes to help us. On the <img> tag add the following classes:


<img class="img img-rounded" src="https://en.gravatar.com/userimage/70717632/53adbdecac04d4ffbe3449993c901a73.jpg?size=200"/>

Now save and refresh the page, notice how much better it looks? In case you missed anything here is what my page markup looks like:

<!DOCTYPE html>
<html>
<head>
    <meta charset="utf-8">
    <meta http-equiv="X-UA-Compatible" content="IE=edge">
    <meta name="viewport" content="width=device-width, initial-scale=1">
<title>About Jyrone Parker</title>
<!-- Latest compiled and minified CSS -->
<link rel="stylesheet" href="https://maxcdn.bootstrapcdn.com/bootstrap/3.3.7/css/bootstrap.min.css" integrity="sha384-BVYiiSIFeK1dGmJRAkycuHAHRg32OmUcww7on3RYdg4Va+PmSTsz/K68vbdEjh4u" crossorigin="anonymous">
<link rel="stylesheet" href="css/main.css">
</head>
<body id="">
<nav class="navbar navbar-default">
  <div class="container-fluid">
    <!-- Brand and toggle get grouped for better mobile display -->
    <div class="navbar-header">
      <button type="button" class="navbar-toggle collapsed" data-toggle="collapse" data-target="#bs-example-navbar-collapse-1" aria-expanded="false">
        <span class="sr-only">Toggle navigation</span>
        <span class="icon-bar"></span>
        <span class="icon-bar"></span>
        <span class="icon-bar"></span>
      </button>
      <a class="navbar-brand" href="#">Jyrone Parker</a>
    </div>
  </div><!-- /.container-fluid -->
</nav>
<div class="container">
	<div class="jumbotron text-center">
<h1>Hi I Am Jyrone Parker</h1>
<img class="img img-rounded" src="https://en.gravatar.com/userimage/70717632/53adbdecac04d4ffbe3449993c901a73.jpg?size=200"/>
<audio loop autoplay>
<source src="http://freesound.org/data/previews/353/353234_3162775-lq.mp3" type="audio/mpeg">
Your browser does not support the audio element.
</audio>
<p>
I am CEO and lead engineer at J Computer Solutions LLC, a consultancy that places software and DevOps engineers at companies in need.
<div itemscope itemtype="http://schema.org/LocalBusiness">
	<h1 itemprop="name">Contact Me</h1>
		Phone: <span itemprop="telephone"><a href="tel:+18594024863">
859-402-4863</a></span>
</div>
</div>
</p>
</div>
</body>
</html>

You can also see my latest code on Github. Next we are going to add some interactiveness with some javascript!! If you haven’t already please subscribe to my blog via email to get notifications on when I post. If you have any questions please leave them in the comments!d